• Home
  • Recipes and Blogposts
  • TheDoughDr Archived Episodes
  • About
  • Ingredient and Baking Videos
Menu

Baking With Colette

Certified Master Baker, Craftsy Instructor, Teaching you to bake your best!
  • Home
  • Recipes and Blogposts
  • TheDoughDr Archived Episodes
  • About
  • Ingredient and Baking Videos

Looking for a perfect bake? Search Recipe and Blogposts below:


Subscribe

Sign up with your email address to receive news and updates.

We respect your privacy.

Thank you!
I am a Craftsy Instructor. www.craftsy.com

I am a Craftsy Instructor. www.craftsy.com

Tweets by BakingwColette

Red Velvet Wedding Cake with Vanilla Bean Buttercream #nakedcake #pastrychef #amoretti #redvelvetcake #baking #laweddings Macaron madness at Art Institute - for Portfolio Show! Rose petal shells with Champagne buttercream and S'mores....#amoretti #macaron #pastrychef #baking
You made it to Friday - indulge with a chocolate chip scone...#5250 #pastrychef #baking #delicious Mini Apple Pies ready for the case at #5250 cafe! Fall baking is in full swing. #baking #fallbaking #apples #applepie #pastrychef #amorettiarmy Croissants fresh out if the oven at 5250 Cafe. #croissant #5250 #amoretti #pastrychef #baking #foodporn Tango Apple Cake with Caramel Icing - new recipe post at BakingwithColette.com. Get inspired for your fall baking today #apples #baking #cake#caramel Cranberry Orange Scones for 5250 Cafe.  Perfect with morning coffee.....Start your day with something sweet. #baking #amorettiarmy #baker #bakery##5250 Chef Rossi competing at Art Institute of Los Angeles - ACF category cold plating desserts :)
Go Chef!!!! #plated desserts There is a theory that Brioche a tete were modeled after Marie Antoinette's breasts -!if true then she was the patron saint of small breasted women. These are so yummy and delicious. #baking#marieantoinette #delicious #brioche#5250 #bread

Rugelach - The DoughDr Recipe from 12/2/2023

December 03, 2023

Hello Bakers,

On Saturday’s show I demoed Rugelach - adding some layers do the mix to build in more flakiness. This is an optional step but it’s worth it. Here is the link to Saturday’s show with the Rugelach demo. Saturday's Show

Rugelach is a traditional Jewish pastry served during holidays and celebrations. It started as a yeasted laminated dough - not unlike croissants and then in the 1950s was transformed into a rich cream cheese dough.

Classically, the dough has no sugar in it. It is equal parts, butter, cream cheese, flour and salt.

Fillings can be sweet or savory. More on fillings in the text below.
Rugelach goes together easily. The dough can be made a day ahead. It will hold for a day in the refrigerator and up to a month in the freezer.

Equipment: Stand mixer fitted with paddle attachment, scale, bowl scraper, rolling pin, sheet pan lined with parchment paper, pastry wheel, pastry rulers (yardstick cut in half).

Ingredients:

170g all purpose flour (1 ⅓ cups +1 Tablespoon)
170g unsalted butter (12 Tablespoons) - cut into medium sized cubes - very cool room temp not chilled

170g cream cheese (12 Tablespoons)  - cut into medium sized cubes - very cool room temp not chilled

1g salt (¼ teaspoon)

Extras: for rolling and finishing: flour for the work surface (bench flour), 1 egg white beaten until it is smooth or water, sugar for final prebake finish.

In the mixer with the paddle attachment: combine the butter and cream cheese. Mix on low (until the mixture begins to come together) and then increase speed to medium and mix for about 1 - ½ minutes on medium. The butter and cream cheese should be combined but it doesn’t need to be a smooth blend.

Sift flour and salt and add to butter mixture. Mix on low speed until just combined. Stop and scrape the bottom of the bowl. 

Scrape the dough out of the mixer and place on a lightly floured work surface. 

Roll into a rough rectangle 12 x 6” fold into thirds.

Give the dough a ¼ turn and roll to approximately 15X6 -¼ thick, shore up the sides and fold into thirds.
Wrap in plastic wrap and chill for 1 hour.
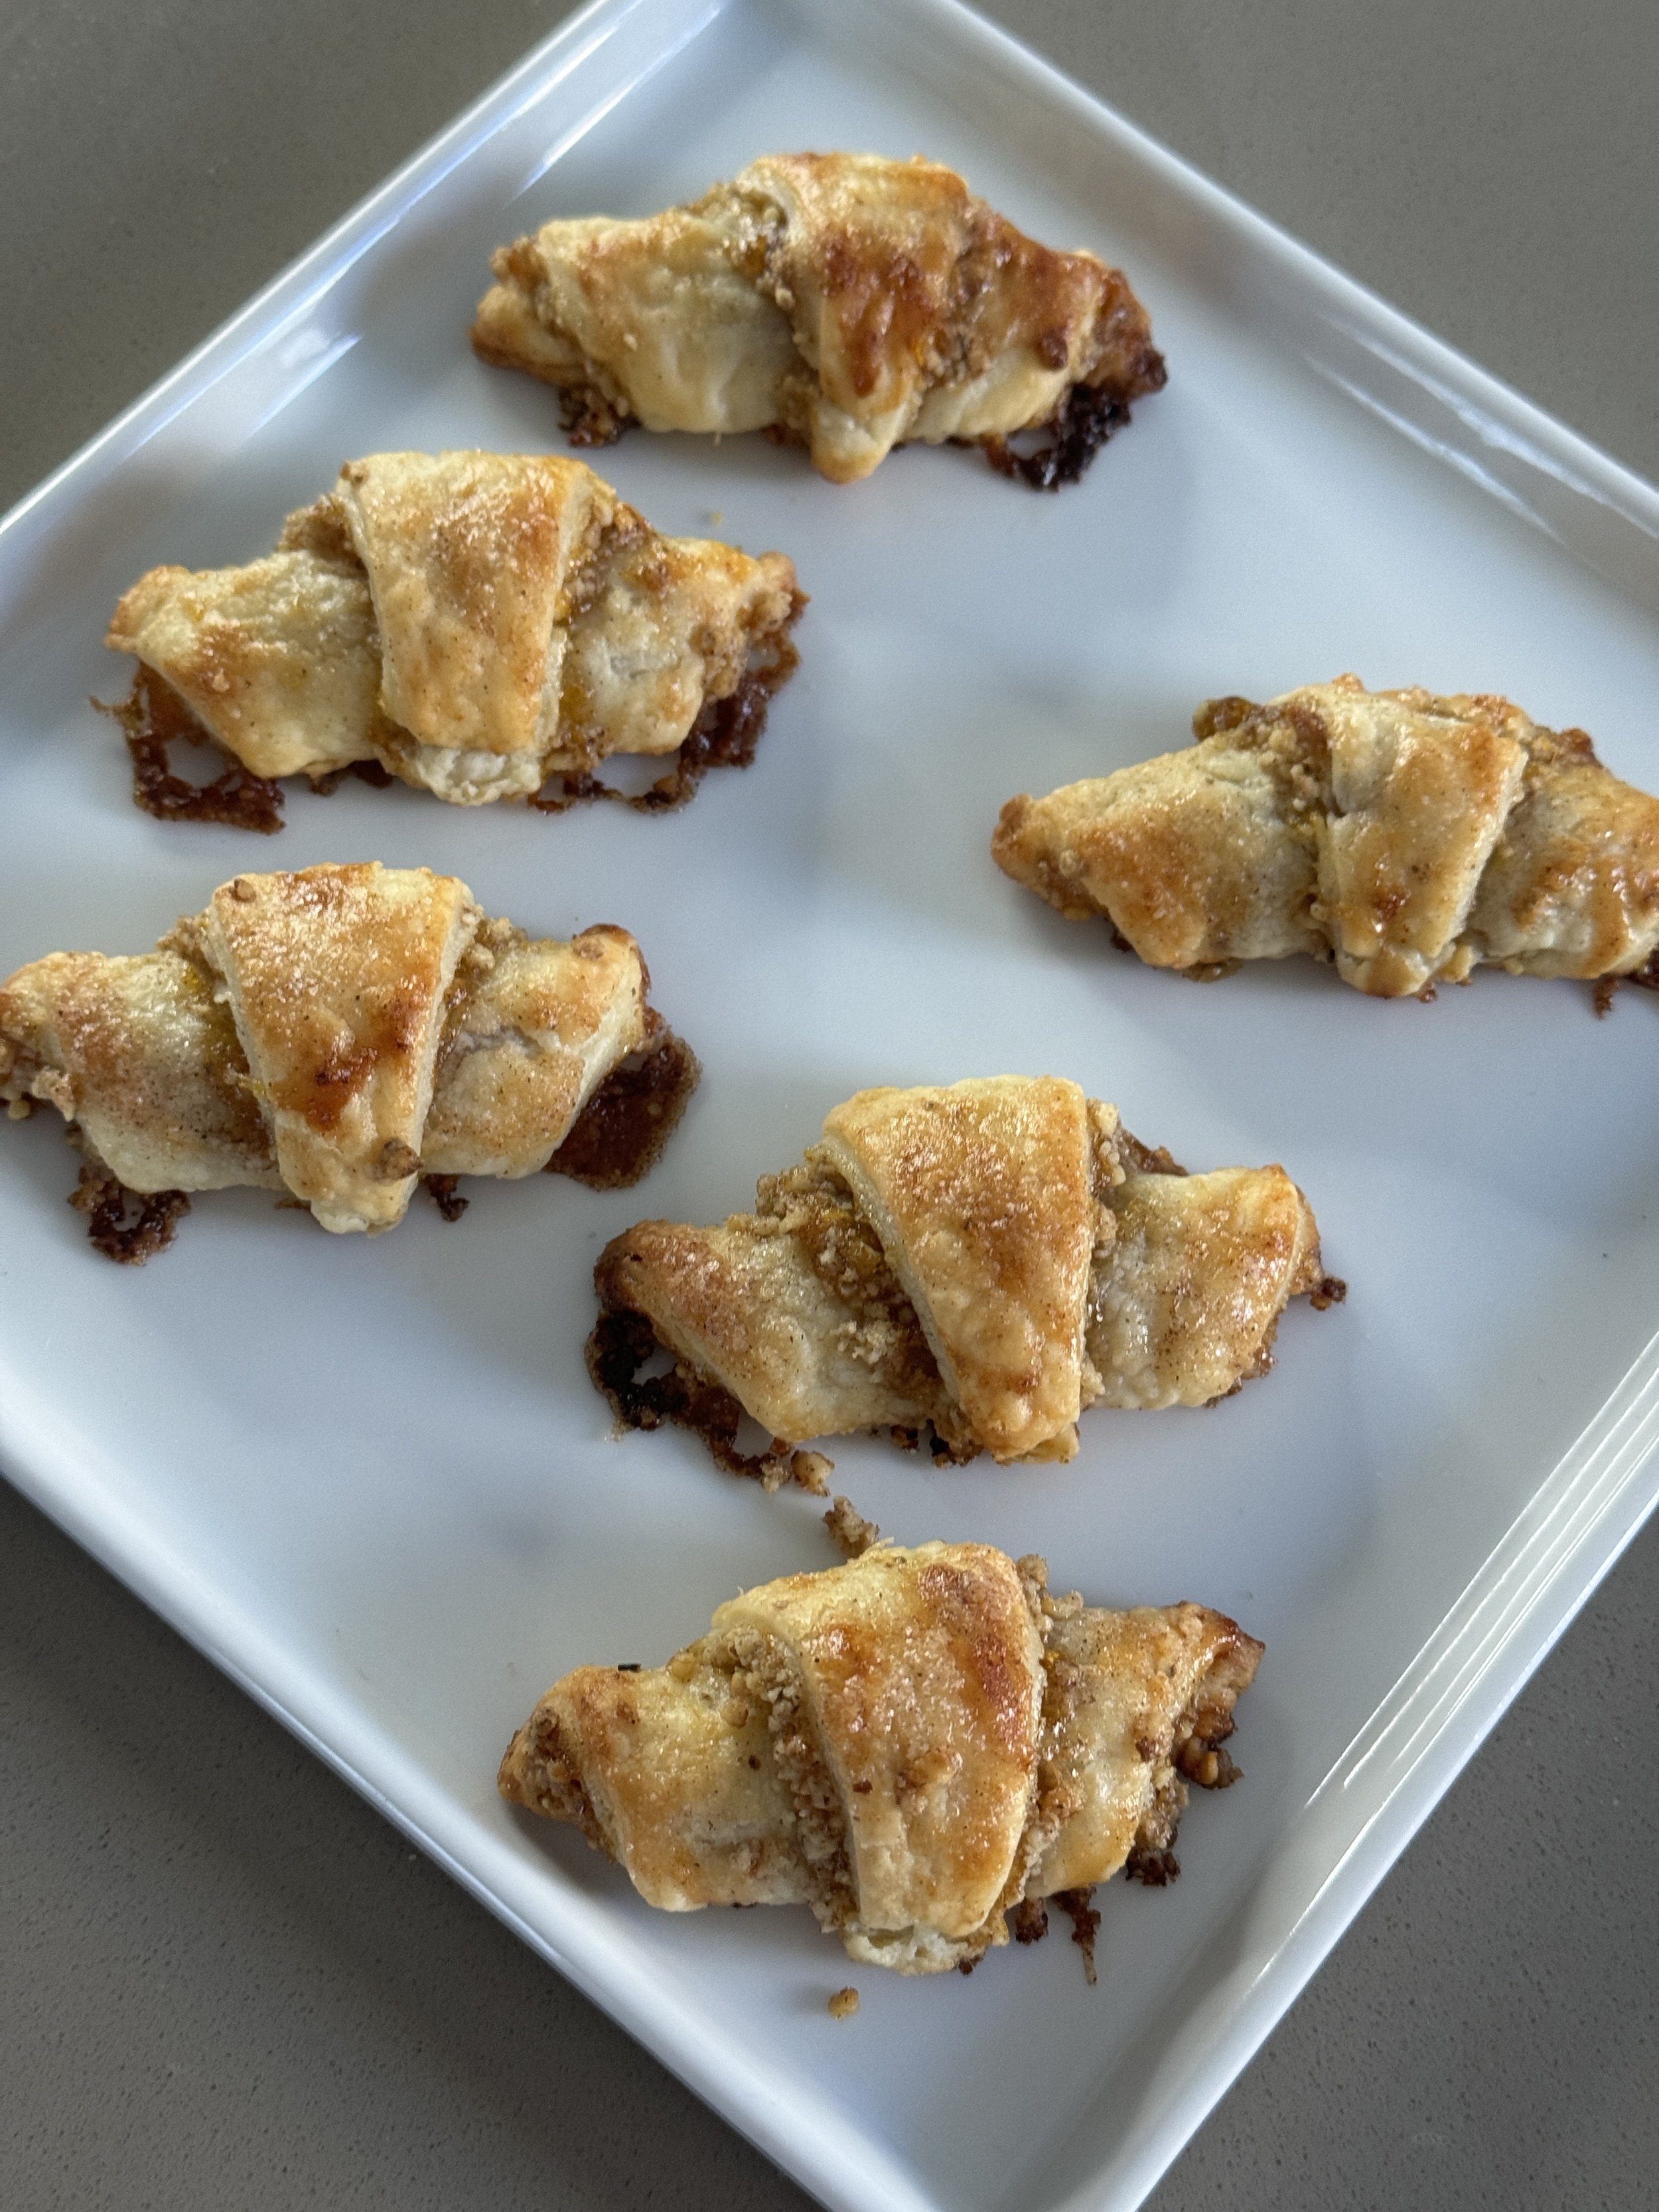
Fillings: good quality jam - any flavor, finely chopped nuts, cinnamon sugar, mini chocolate chips, nutella
Note: Rugelach can also be savory - pesto, chopped pine nuts and cheese, pizza rugelach - so many possibilities.

Preheat oven to 375 degrees.

Remove the dough from the refrigertor, divide in half - work with half the dough at a time and return the remaining dough to the refrigerator.
On a lightly floured surface, roll dough into a 10” circle, 1/8” thick.
Spread with jam, top with finely chopped nuts and sprinkle generously with cinnamon sugar.
Cut the circle into half crosswise and lengthwise and then into 10 equal pieces.
Roll wide end to narrow end - they will look like little croissants.

Place 1” apart on prepared sheet pan. Brush with the beated egg white or water and sprinkle with sugar, sanding sugar (larger crystals) or cinnamon sugar.
Bake at 375 degrees for 15 minutes - double panning halfway through if the bottoms of the rugelach are over browning.
Let rugelach cool on a wire rack and store in an airtight container for up the five days.


Comment

Pumpkin Apple Hand Pies

November 20, 2023

Hello Bakers,

On Saturday’s show, we made Thanksgiving pie dough - here is the link to the show and the demo: Saturday's Show with Demo . With my dough, I decided to make these pumpkin apple hand pies. The combination of apple and pumpkin are delicious. Give it a try - a perfect bake if you have pie dough, extra apples and an extra 100g of pumpkin puree in the refrigerator.
Hand pies are delicious all year round - and the pumpkin apple is a perfect fall filling.

Happy Baking!
Colette

Yield: 6 Hand pies

Equipment
Rolling pin, pastry brush, saute pan, knife, scale

Apple Pumpkin Hand Pie Assembly MEP

Ingredients:
250g peeled, small dice apples
28g butter
42g granulated sugar
42 brown sugar
1/2 teaspoon cinnamon
scant 1/4 teaspoon nutmeg
pinch salt
15g lemon juice
15g cornstarch
30g cold water
100g pumpkin puree

  1. In a large saute pan melt butter over medium high heat

  2. Add apples and cook for 2-3 minutes

  3. Add sugars, cinnamon, nutmeg, lemon juice and salt.

  4. Reduce heat, cook for 2 minutes

  5. Combine cornstarch and water until smooth and add to apple mixture and cook for about a minute until it thickens a little.

  6. Add pumpkin puree and stir until well combined.

  7. Pour onto a plastic wrapped baking tray and allow to cool for 15 minutes.

  8. Cover with plastic wrap, cover and refrigerate until read to use.
    Can be made a day ahead and refrigerated.

On Saturday’s DoughDr Episode we made pie dough as a group - here is the recipe and the video.

Pie Dough

340g, (2 ¾ cups + 1 Tablespoon) All Purpose Flour - unbleached
14g, (1 Tablespoon) Sugar
3g, (½ teaspoon) Salt
128g (1 stick + 1 Tablespoon) chilled unsalted Butter
76g vegetable Shortening - frozen, (⅓ cup)
4g, (1 teaspoon) Apple Cider Vinegar
113g, ( ½ cup) Ice water - pour off ice

Method: 

!. In a large bowl, sift dry ingredients.

2. Cut in butter, thenthe  shortening with a pastry blender or bowl scraper.

3. Add vinegar and water - mix until it’s a cohesive mass - keep in bowl until dough forms.

4. Flatten, wrap and chill for 1 day and freeze for up to 1 month.

Hand Pie Assembly

Preheat over to 375
Line a sheet pan with parchment paper

Egg wash (1 egg whisked vigorously with a pinch of salt)
or water - cinnamon sugar for garnish

Roll out the dough to 1/8”
Cut the dough into 4” x 3 “ rectangles (I made a paper template from an index card)
Place the rectangles on prepared pan, spoon pumpkin apple filling in the center of the dough - roll the tops out just a little larger and place on top of the filling.
Brush with water, garnish with cinnamon sugar.
Bake at 375 degrees for 22-25 minutes until golden brown.

Comment

Plum Cake - it’s that sweet sour cream layer that makes this so special.

Plum Cake with Streusel - This Small Batch Cake Serves Eight

October 03, 2023

Hello Bakers,

So after decluttering my cookbooks, I actually started using the ones I kept more, especially my bread books. I have a series of Bread books by Beth Hensberger, a very talented and prolific cookbook author from the late eighties and into the aughts. I looked her up and found that she had died in 2021. Well, that made me very sad becuse if you have any of her books and she went well beyond bread - she was very talented.

You can kind them still on Amazon and most are on Kindle too

This small batch plum cake was inspired by one of her recipes. I scaled it down, put it in grams and modernized it a little. Beyond plums it can be made with peaches, nectarines, blueberries and canned pears, well drained. Or you could use poached pears if you like.

What takes it to the next level is the sour cream that is spread on the top of the cake before the fruit and streusel are arranged on top. It’s so good.

Give this a try, bakers it’s a cross between a brioche and a baba savarin. It goes together quickly as it does not bulk ferment only proofs.

Plum Crumb Cake:

Yield 1 8 cake - serves 6-8

Components: Yeasted Kuchen Dough, Easy Crumb Topping, Pitted and sliced plums

Start to Finish:

Yeasted Dough:

Equipment: Stand Mixer Fitted with dough hook, bowl scraper or spatula, 8” springform or regular cake pan - well greased with softened butter, spatula

250g bread flour
43g sugar
4g yeast
4g salt
143g milk, 80 degrees
1 large egg (50g)
43g unsalted butter, softened
4g vanilla extract

Mise en place - milk and yeast hydrating in the mixer bowl


Combine milk and yeast in the bowl of a stand mixer. Let sit for 5 minutes.

Add egg, sugar, vanilla, lemon zest,  flour and salt and mix for 2 minutes on speed 2.

Add softened butter and mix on speed one for 2 minutes and then finish with a 2 minute mix on speed 2. You are looking for the dough to be smooth and silky. Mix for an additional minute on speed 1 if it is not smooth.

Place dough in the prepared pan. Press the dough into the bottom and sides of the pan.

Cover and let sit at room temperature for 1 hour.

In the meanwhile, prepare the crumb topping and the sour cream layer
Crumb Topping

75g AP flour 
30g sugar
30g brown sugar
Pinch salt
1 teaspoon cinnamon
43g unsalted butter, melted

Place all ingredients except melted butter in a medium sized bowl, stir well, add butter and mix until the dry ingredients are combined and the mixed gets crumbly.

Sour cream topping
120g sour cream
38g sugar
11g flour
4g vanilla extract

Combine all ingredients in a medium sized bowl and whisk until smooth

4 plums, pitted and sliced

Plum Cake Assembly
Preheat oven to 375 degrees

Before baking - try not to overcrowd the top with plums

Equipment: baking tray for underneath cake pan, offset spatula, spatula
Place cake on baking tray, pour sour cream topping over batter, spread evenly on surface, fan sliced plums on the top of the cake - starting with the outside edge.
Top with crumb topping.
Bake at 375 for 35 minutes. Let cool for 20 minutes before removing from the pan.

Comment

Blueberry Bagels - make you own!

Blueberry Bagels! America's #1 Flavor

September 15, 2023

Hello Bakers!

Did you know that America’s #1 favorite bagel flavor is blueberry. I know - kind of shocking with all that everything seasoning out there.
And I know that I post a lot of bagel recipes but this is the one you are going to make!

Now there is no negotiation on the blueberries - they have to be dried - fresh or frozen will yield a hot mess of extra moisture and bleeding berries.

Here is the recipe - the tutorial in full - is on my You Tube channel which I a trying to grow so please check out the channel “Ask the DoughDr” You Tube Channel and please subscribe - I appreciate it. Here is the step by step Blueberry Bagel Tutorial: Blueberry Bagel Tutorial

Here is the recipe for the Blueberry Bagels - the smear of choice - honey cream cheese - recipe below. Any questions - let me know and please tag me when you post your beautiful bakes.

Here

Equipment:

Stand mixer fitted with the dough hook, scale, bowl scraper, half sheet tray, parchment paper or silpat, veg oil or pan spray, medium to large pot for boiling the bagels, spider, slotted spoon or skimmer.

Blueberry MEP

Yield 6 bagels

244g water (80 degrees)

4g (1 teaspoon) Instant yeast or active dry

8g (2 teaspoons) vegetable oil

20 (1 Tablespoon + 2 Teaspoons) honey

420g bread flour

8g salt

85g dried blueberries

Boiling Liquid

2 quarts water

50g honey or brown sugar

16g baking soda (optional) - it helps with caramelization

   Make space in your refrigerator for the tray of shaped bagels.

  1. Combine water and yeast in the bowl of a stand mixer, fitted with the dough hook. Let stand for 5 minutes.

  2. Add oil, honey, bread flour and salt.

  3. Mix on speed 2 for 3 to 4 minutes

  4. Change to speed 1 and mix for 3 more minutes. The dough will be tough and not sticky.

  5. Add the dried blueberries and mix for one more minute or until they are evenly incorporated.

  6. Let rise, covered, at room temperature for 1 hour to 1 hour and 15 minutes.

  7. Divide the dough into 113 g portions. Depending on how you are shaping them, preshape into a short cylinder shape or a round cover and let sit for 7-8 minutes and then final  shape. Shape into bagels and place on a lightly sprayed parchment lined tray.

  8. Cover and let proof at room temperature for 15 minutes.

  9. Move to the refrigerator for 2 hours - no longer than 8. This chilling retards the bagels, slowing down the yeast and making sure the bagels don’t overproof when boiled.

  10. Preheat the oven to 450 degrees

  11. Bring water, honey or brown sugar and baking soda to a boil in a large saucepan.

  12. Boil the bagels for 30 seconds on each side, flipping halfway through.

  13. Remove, drain and return to the sprayed parchment paper lined baking tray.

  14. Top with sesame seeds, poppy seeds or everything seasoning.

  15. Bake for 17 - 20 minutes until the crust is shiny and a deep golden brown. Bake on the middle rack and spin the bagels halfway through if necessary.

  16. Bagels freeze for up to one month.

    Honey Cream Cheese:

    4 ounces (113g) cream cheese - softened
    2 Tablespoons of honey

    1. Using a spatula, combine ingredients in a small bowl and mix well until smooth. Store leftovers in the refrigerator.

Learn more


Comment
Newer / Older
Back to Top

email: bakingwithcolette@gmail.com