Cream Cheese Tart with Strawberries - the DoughDr Episode 4/29/2

Finished Strawberry Tart

Hello Bakers,
Here are the recipes from Saturday’s DoughDr Episode. On Saturday’s show I demoed rolling out the sweet tart pastry, making the cream cheese filling and garnishing the tart.
Here is the link: Saturday's Show
Any fruit or any your favorite cheesecake can be used to top your cheesecake tart.
This tart goes together easily, even more quickly if you have a batch of dough in the freezer. Give it a try and tag me when you do. Chef Colette's IG
I love to see your beautiful bakes.

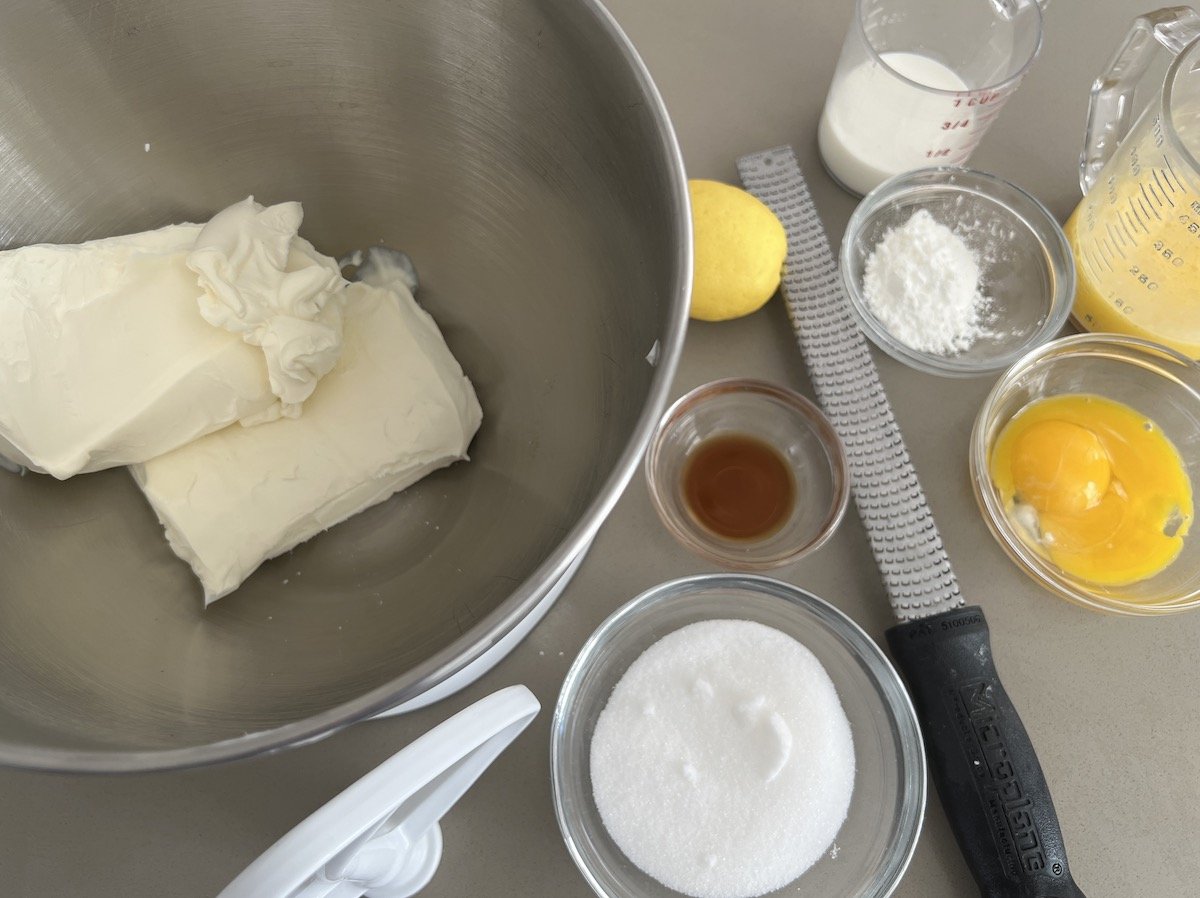
Cream Cheese Filling MEP

Making the cream cheese filling

Fills a 10” tart shell

Equipment: Stand mixer fitted with the paddle attachment, scale, teaspoons, spatula, fine strainer or tamis, plastic bowl scraper, whisk

Something like this works great: Strainer/Sifter

454g cream cheese (2 8 ounce packages) softened for 2 hours at room temperature

71g sugar

4g (1 teaspoon vanilla)

Zest of 1 lemon

100g eggs (2 large eggs) - whisked until the yolks and egg whites are combined

2 egg yolks

57g (2 ounces) heavy cream, half and half or milk

10g cornstarch (1 Tablespoon)

Preheat the oven to 350 degrees and place a baking tray in the oven to preheat with the oven. Setting the tart on a hot baking tray helps the bottom crust get a full bake. This is a good technique with pies too.
In a stand mixer fitted with the paddle attachment, soften the cream cheese until smooth on medium low speed for 1 to 1/1/2 minutes.
Turn the mixer to low and add the sugar in a slow stream, add the vanilla
Stop the mixer and scrape down.
Beat in half the eggs - stop and scrape down.
Beat in the second half of the eggs , stop and scrape down.
Add the egg yolks.
Whisk together the heavy cream and cornstarch. Add to cream cheese mixture until combined. Do not overbeat or the filling could crack during baking.
Place the strainer over a clean bowl and strain the filling through it - this is an extra step but ensures that the small lumps of cream cheese will disappear.
Pour filling into the unbaked crust.
Using oven mitts or two dry towels, remove the preheated baking tray from the oven, carefully place the filled tart shell on it. Return the tray to the oven.
Bake for 30-35 minutes until the filling is set.
Remove the tart to a rack to cool.
Prepare strawberries or garnishing fruit. Wash, dry, slice.
Make apricot jam glaze (Nappage) if using.

Garnishing the tart:

 Wash and dry berries, hull and cut in half or slices. Start at the edge of the tart and arrange berries in a circle covering the filling. Brush berries carefully with warm, fluid nappage. Any fruit you use should be brushed with nappage if you want a bit of shine.
Nappage adds shine to the appearance, act as a preservative and a bit of flavor.

With garnish: refrigerate one day - loosely covered with plastic wrap or in an airtight cake/pie keeper. Without garnish - refrigerate two days.

Apricot Glaze “Nappage”

Buy the least expensive apricot jam – the store brands are the best because they usually contain the most pectin.

Put the jam into a small saucepan with 4  ounces of water – cook over medium low heat until the jam liquifies – if it is too thick add more water – strain and use to brush on finished pastries

The strained jam can be cooled slightly and returned to the jar – store in the refrigerator for up to one month.


Baked tart before garnishing


Sweet Tart Dough - Spring Tart Series #1 The DoughDr Episode April 15, 2023

Hello Bakers,

On Saturday’s show, we started our series on Spring tarts. In this series, we are going to cover three basic tart shells and a variety of fillings.

I demoed a sweet tart dough using the cut in method, mixing the dough by hand. Here is the link to Saturday's Show

So when do you use one tart shell over another - sweet tart shells are used when a raw filling and a raw dough are baked together - the small amount of baking powder helps the dough expand by creating enough expansion of C02 that the dough adheres to the bottom and sides of the pan better - less shifting and shrinking. Sweet dough has a higher percentage of sugar and a lower amount of fat so it is easier to handle and more difficult to overwork. Don’t you just love the science behind all this? So cool.

On Saturday’s show we talked about creating a bakalong of sorts - building on our first tart together - which is going to be a strawberry cream cheese tart.
So this week - if you want to bake along with the show, please make a batch of this dough and freeze it - then Friday night move the dough to the refrigerator and let it thaw overnight. Keep it cold until rolling it out Saturday - during the show.

The best pan for your tarts is a 9-10” pan with a removable bottom.

9-10” Tart pan with removable bottom

Equipment: Large bowl, scale, teaspoons, sifter, bowl scraper and plastic wrap.

Ingredients:
213g All purpose flour
75g Sugar
1g (¼ tsp)  Baking powder
1g (¼ tsp) Salt 
85  Butter, cool and cut into small chunks - not softened or chilled in between
75g Egg - beaten up well with a fork or a small whisk.

In a large bowl, sift together the flour, sugar, baking powder, and salt.
Dot the pieces of butter over the dry ingredients.
With your fingertips break the butter into the smaller pieces and gently squeezing to rub it into the flour and catch the flour from the bottom of the bowl. 
Continue rubbing in the butter until the mixture has a sandy appearance. No visible pieces of butter should remain. It will look like crumb topping.
Pour the egg over the flour mixture and use the bowl scraper to push the egg and flour together. Keep working together until the dough comes together in a cohesive mass.
Lightly flour the work surface, remove the dough from the bowl and fold it over on itself once or twice. Pat into a ½” circle, wrap in plastic wrap and refrigerate for up to 5 days or freeze for up to 1 month. 
Thaw the dough in the refrigerator overnight before using

Lemon Sponge Roll for Passover and Gluten Free (Copy)

Hello Bakers,

Here is the recipe and photo tutorial for the Lemon Sponge Roll. There is no wheat flour in the recipe which makes it suitable for Passover and gluten free baking. This version is filled with dairy free lemon curd (made with kosher margarine). There are lots of other options for fillings like your favorite jam. I have also seen versions that are filled with whipped cream and berries - yum.
Many Passover sponge cakes use double the amount of eggs and are made in a tube pan - since not everyone has a tube pan - I am offering a rolled version. I baked this one in a traditional 10” x 15” jelly roll pan - which makes for a thicker sponge - you can also use a half sheet pan 13” x 18” which will be thinner and will bake more quickly.
It’s a delicious cake - especially with the zest added to the batter.
Those of you who love lemon - will love this.

Equipment: Stand mixer fitted with whisk attachment, scale, spatula, offset spatula,

15” x 10” jelly roll pan greased the bottom lined with parchment.

First a note about the ingredients standing in for flour:

Matzo Cake Meal:
Matzo cake meal is finely ground matzo. Cake meal is also made from already-baked matzo, it doesn't absorb liquid or develop structure in the same way flour does.

Matzo Cake Meal - available in most grocery stores

Potato starch is starch that is extracted from potatoes - if you have seen potato flour that is made from dried potatoes - potato flour is used as a thickener while potato starch is a binder which is why it works so well in this sponge roll recipe - it absorbs liquids well which balances out the matzo meal

Potato starch is starch that is extracted from potatoes - if you have seen potato flour that is made from dried potatoes - potato flour is used as a thickener while potato starch is a binder which is why it works so well in this sponge roll recipe - it absorbs liquids well which balances out the matzo meal

Sponge Roll MEP

Egg yolks, lemon zest and sugar- whipped until pale and thick

Transfer the egg yolk mixture to a large mixing bowl and wash & dry mixer bowl and whisk attachment.

In the bowl of the stand mixer fitted with the whisk attachment, place egg whites. Whip egg whites on medium speed until they are frothy and no liquid egg white is left. It should look like cappuccino foam but not have structure.

With the mixer running on medium speed add the second sugar by ‘raining” it in.

Stop the mixer and quickly scrape down.

Turn speed to medium high, whipping the mixture on medium-high speed until medium    peaks have formed, being careful not to over whip.(about 2 minutes)

The mixture should resemble shaving cream but still be soft. Increase speed to high and whip until a firm peak forms. (about 2 minutes). The angle of the peak will be a little less than straight up and down - if it were clock hand, it would be at 11:30.

Add a third of the meringue into the egg yolk mixture.  Incorporate the meringue carefully using a spatula - mix lightly and stop mixing as soon as each increment disappears, then add the next one.

Sift follow on top of egg mixture - this helps keep the mixture light

Sift the matzo meal and potato starch onto the egg mixture, in two increments, fold in carefully.

Spread the mixture onto a prepared half sheet pan. Smooth the surface with an offset spatula. Clean the sides of the pan with your thumb.

Bake at 375 degrees.

Start checking in 14 minutes – it should be a very light toast color with no liquid sugar droplets on the surface of the cake.

Allow to cool slightly on a wire rack before rolling.

Baked Sponge

Rolling the Sponge:

!. Sprinkle a piece of parchment paper larger than the cake with a dusting of granulated sugar, Invert the cake onto the sugared surface ( this helps it not stick) and then peel off the parchment paper from the bottom of the cake - turn it over so the sticky side is facing up and grabbing the top corners of the paper and the cake - flip it over. Remove the cake parchment and discard.

Spread lemon curd or jam on sponge - leaving about 3/4” of the long top edge free.

Using the parchment paper - roll the sponge - it may crack a little because it has no fat in it besides the fat in the egg yolks. But this can be covered up with a meringue, whipped cream or a dusting of powdered sugar. If it is baked in a half sheet pan and is thinner it cracks less.

Wrap the roll tightly in parchment paper and place in the refrigerator for a minimum of 2 hours before serving.

Non dairy Lemon Curd
Equipment: saucepan, whisk, strainer, scale, medium bowl, small baking tray lined with plastic wrap, spatula, instant read thermometer

Ingredients:

100g fresh lemon juice
125g sugar
72g egg yolks (4 large)
Zest of one lemon
85g kosher margarine - softened

  1. In the saucepan, whisk the lemon juice and sugar together until well combined, Add the egg yolks and zest. Whisk until smooth not foamy.

  2. Turn the heat to medium and cook until the mixture begins to thicken but does not boil. Stir all the while.

  3. The curd is done when the initial foamy created by whisking the ingredients together subsides, steam wafts off the surface and the the temperature of the curd is about 176-180 degrees.

  4. Stran the curd into a medium bowl cool to 100 degrees and whisk in the softened margarine.

  5. Pour the curd onto the plastic lined sheet pan, cover with plastic wrap - there is usually enough to fold over the curd.