• Home
  • Recipes and Blogposts
  • TheDoughDr Archived Episodes
  • About
  • Ingredient and Baking Videos
Menu

Baking With Colette

Certified Master Baker, Craftsy Instructor, Teaching you to bake your best!
  • Home
  • Recipes and Blogposts
  • TheDoughDr Archived Episodes
  • About
  • Ingredient and Baking Videos

Looking for a perfect bake? Search Recipe and Blogposts below:


Subscribe

Sign up with your email address to receive news and updates.

We respect your privacy.

Thank you!
I am a Craftsy Instructor. www.craftsy.com

I am a Craftsy Instructor. www.craftsy.com

Tweets by BakingwColette

Red Velvet Wedding Cake with Vanilla Bean Buttercream #nakedcake #pastrychef #amoretti #redvelvetcake #baking #laweddings Macaron madness at Art Institute - for Portfolio Show! Rose petal shells with Champagne buttercream and S'mores....#amoretti #macaron #pastrychef #baking
You made it to Friday - indulge with a chocolate chip scone...#5250 #pastrychef #baking #delicious Mini Apple Pies ready for the case at #5250 cafe! Fall baking is in full swing. #baking #fallbaking #apples #applepie #pastrychef #amorettiarmy Croissants fresh out if the oven at 5250 Cafe. #croissant #5250 #amoretti #pastrychef #baking #foodporn Tango Apple Cake with Caramel Icing - new recipe post at BakingwithColette.com. Get inspired for your fall baking today #apples #baking #cake#caramel Cranberry Orange Scones for 5250 Cafe.  Perfect with morning coffee.....Start your day with something sweet. #baking #amorettiarmy #baker #bakery##5250 Chef Rossi competing at Art Institute of Los Angeles - ACF category cold plating desserts :)
Go Chef!!!! #plated desserts There is a theory that Brioche a tete were modeled after Marie Antoinette's breasts -!if true then she was the patron saint of small breasted women. These are so yummy and delicious. #baking#marieantoinette #delicious #brioche#5250 #bread

Pizza Dough! The DoughDr Episode 1/28/23

January 30, 2023

Hello Bakers

There is so much to say about the benefits of making our own pizza dough - but I will keep it brief because I want you to experience the satisfaction of making your own dough and crafting your own pizzas.

This can be done easily with basic baking equipment. Should you want to level up your pizza making equipment - I have suggestions for you below.
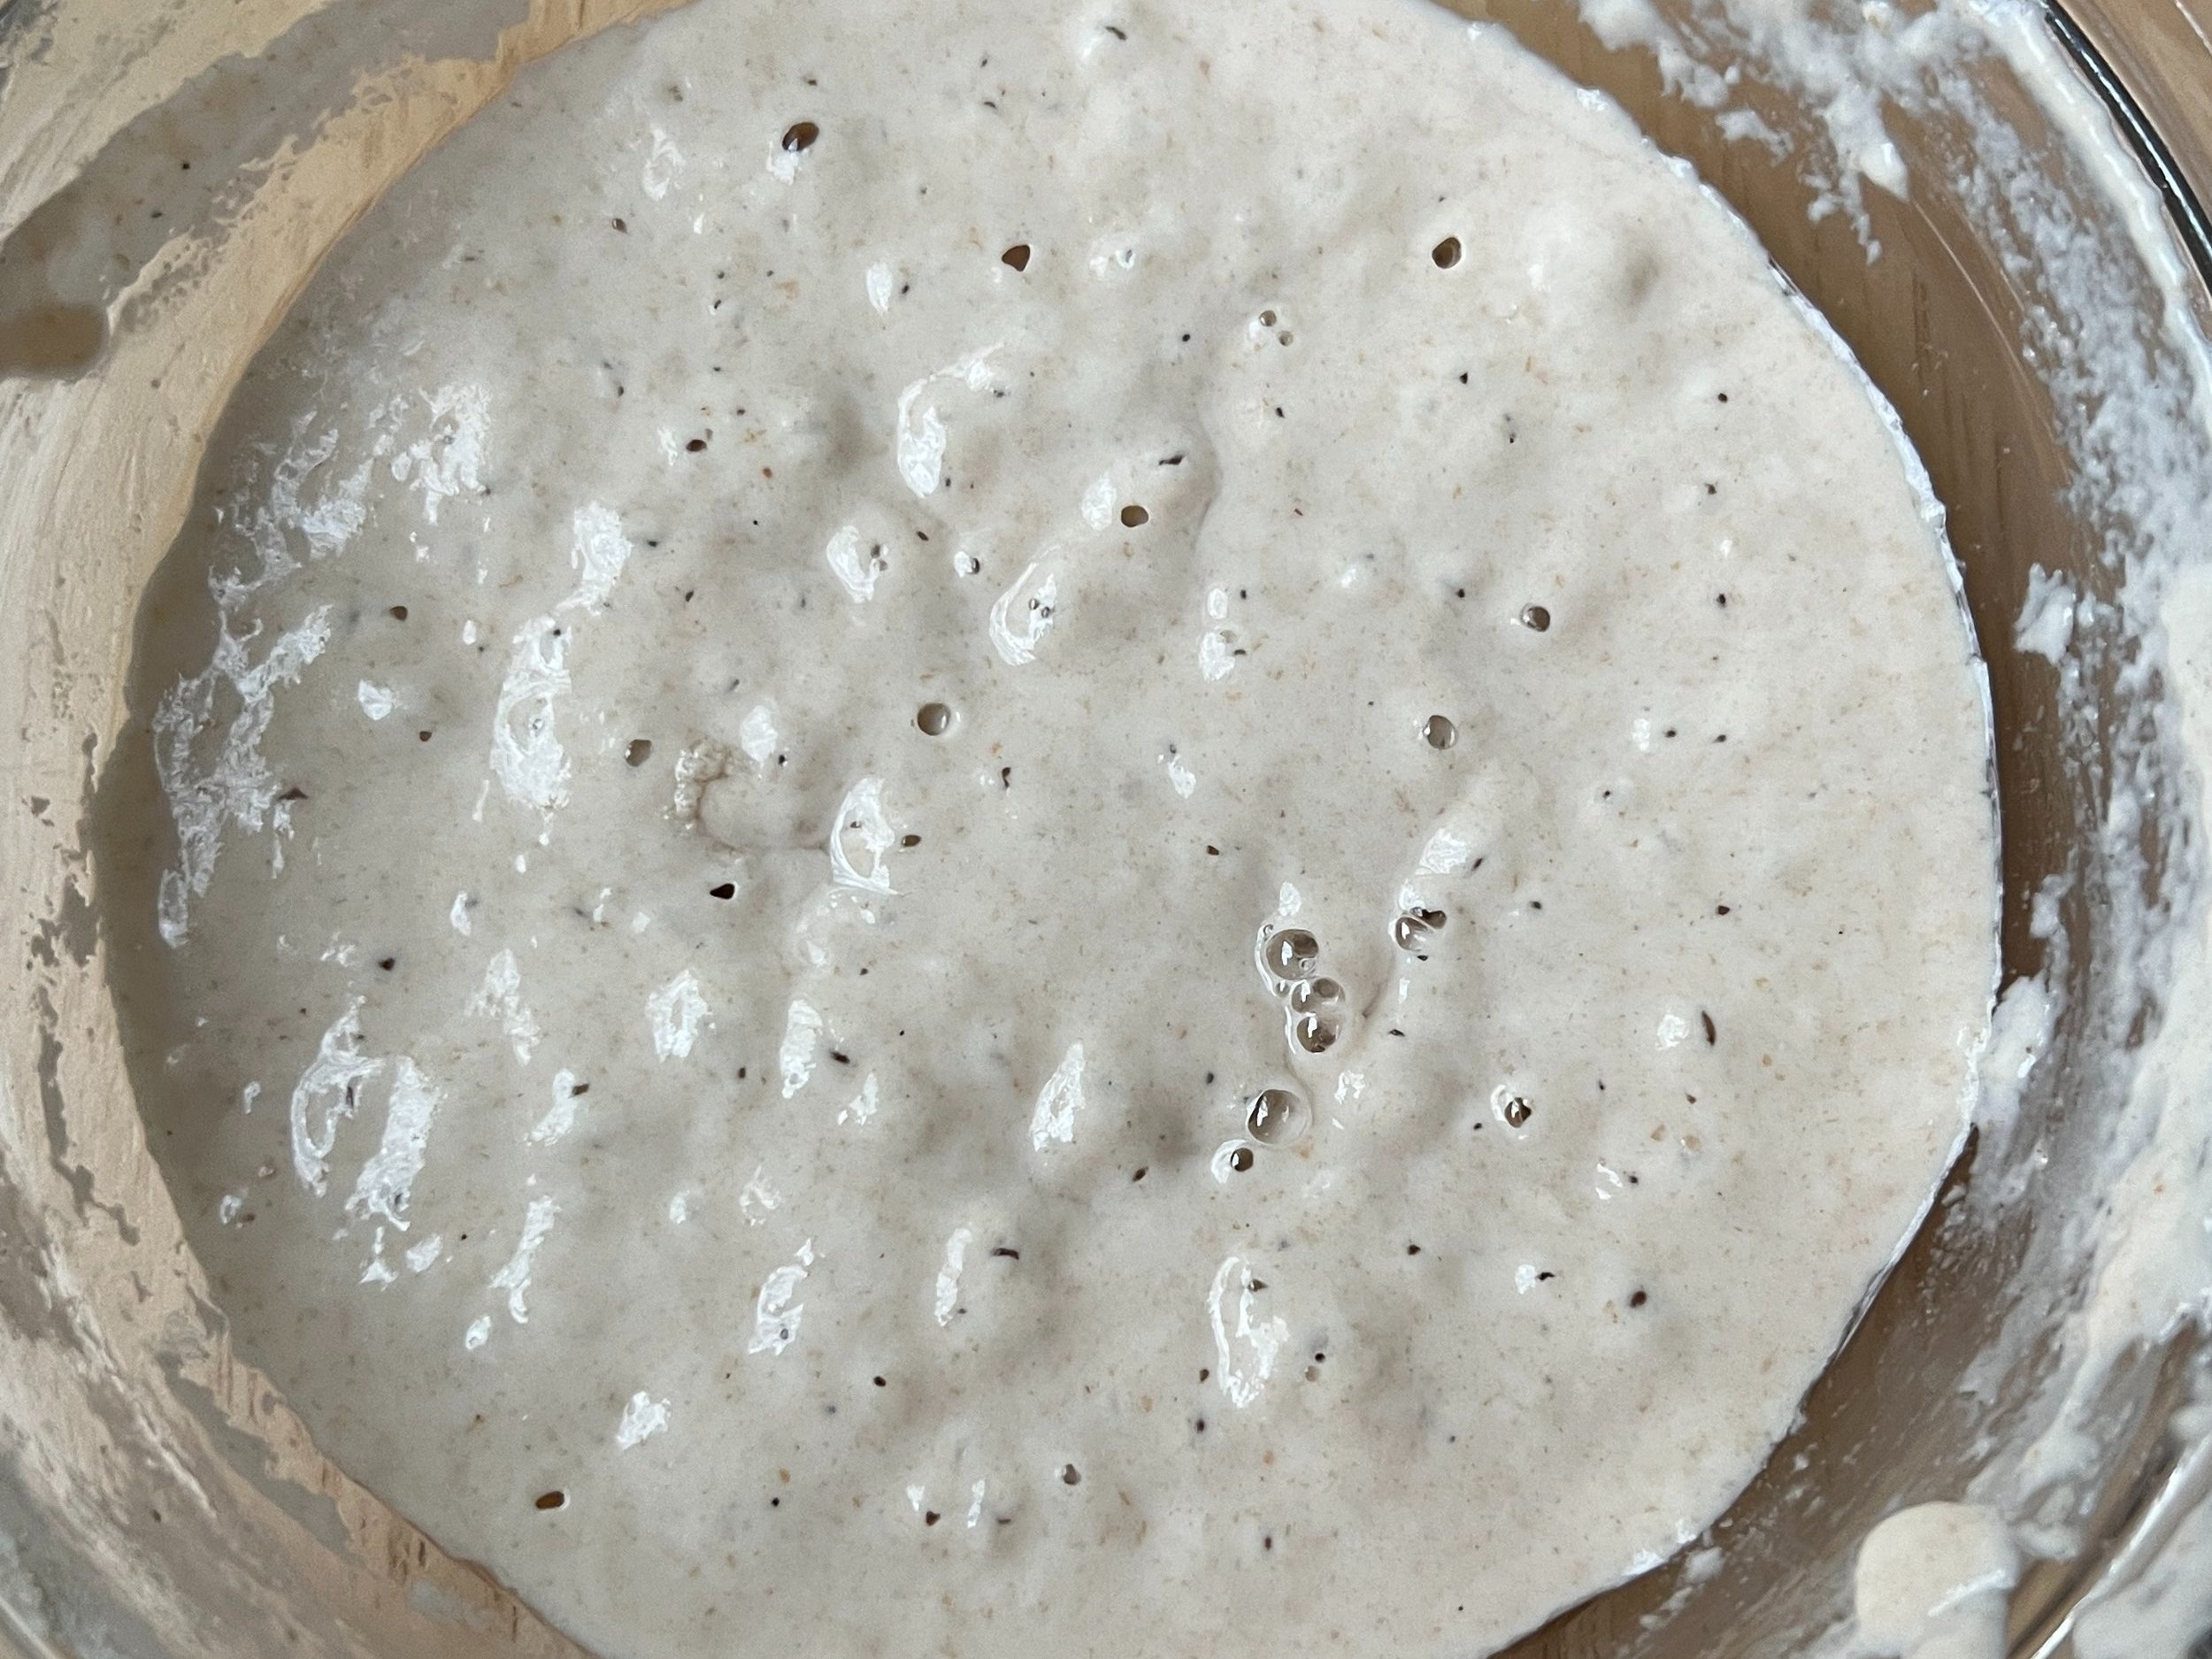
We are at 65% hydration which means this dough is going to be stickier than last week’s breadsticks. In the show I demoed mixing the dough by hand but use the mixer is you have one - the method for both is below. Here is the link to the show: Saturday's show

If any questions come up for you - please message me here or on Instagram @bakingwcolette. And please tag me in your bakes as it makes me so happy to see your beautiful work.

Happy Baking! Colette

Pizza Dough Mise en place

400g bread flour (100%)
260g water - 80 degrees (65%)
5g yeast (1.25%)
18g olive oil (4.5%)
7g salt (1.8%)
Total dough weight: 690g 
Yield: 3 8 ounce pizza crusts

Basic Equipment: Oven, Scale, Large mixing bowl, bowl scraper, pastry brush, dough storage container, plastic wrap or lid.

Next level: Pizza stone, Stand Mixer with dough hook attachment, pizza pans or screens, pizza   peel, parchment paper.

Getting Started: 

1. Gather your equipment and Ingredients

2. Mix dough and set up for bulk fermentation

3. After one hour, degass dough, shape into 227g balls and refrigerate overnight.

4. Prepare toppings - cool any cooked toppings to room temperature and drain any excess liquid from juicy toppings like mushrooms.

5. Preheat the oven.

6. Assemble pizzas - bake and enjoy! 

Making the dough:

In a large mixing bowl or in the bowl of your stand mixer, fitted with the dough hook, combine the water and the yeast, stir for 10 seconds and let sit for 5 minutes.

Add the olive oil, flour and salt.

If mixing by hand - use the dough scraper to incorporate the liquid and flour mixture, work quickly and deliberately - we are looking for it to become a shaggy cohesive mass within a few minutes. Once it clears the side of the bowl - dust your work surface, lightly, with flour and then dump out the dough - it will be sticky - lightly flour your hands ***key word is lightly,  and knead until the dough is smooth - use your bowl scraper if it becomes too sticky to handle.

***Adding too much flour will make the dough heavy and the finished crust chewy and tight.

Knead for a few minutes until smooth. Return to the well scraped mixing bowl or a clean one that has been lightly greased with olive oil, cover and let sit at room temperature for one hour.

In the mixer - mixing on speed 2 for 2 minutes, then reduce speed to low and mix for an additional minute - please use your timer. Optional - mixing - dump the dough out onto your work surface and knead - for 30 seconds - return to mixer bowl, cover and let sit at room temperature for one hour.

After one hour, gently press the gas out of the dough, divide into 227g (8 ounce balls) place in oil coated container, flip the balls over to coat the tops, cover and refrigerate overnight. At this point the dough can also be frozen for up to one month. Place balls of dough, individually in Zip Loc bags, label and date.

Dough Balls

Preheat the oven to 450 degrees , 425 if your oven has a convection setting. If you are using a pizza peel make sure that it preheats for at least 30 minutes.

If using a pizza pan, sheet - pan or screen brush well with olive oil. Optional: dust the pan with corn meal or semolina. If you want to bake the pizza right on the pizza stone shape on a square of parchment paper that has been lightly oiled.

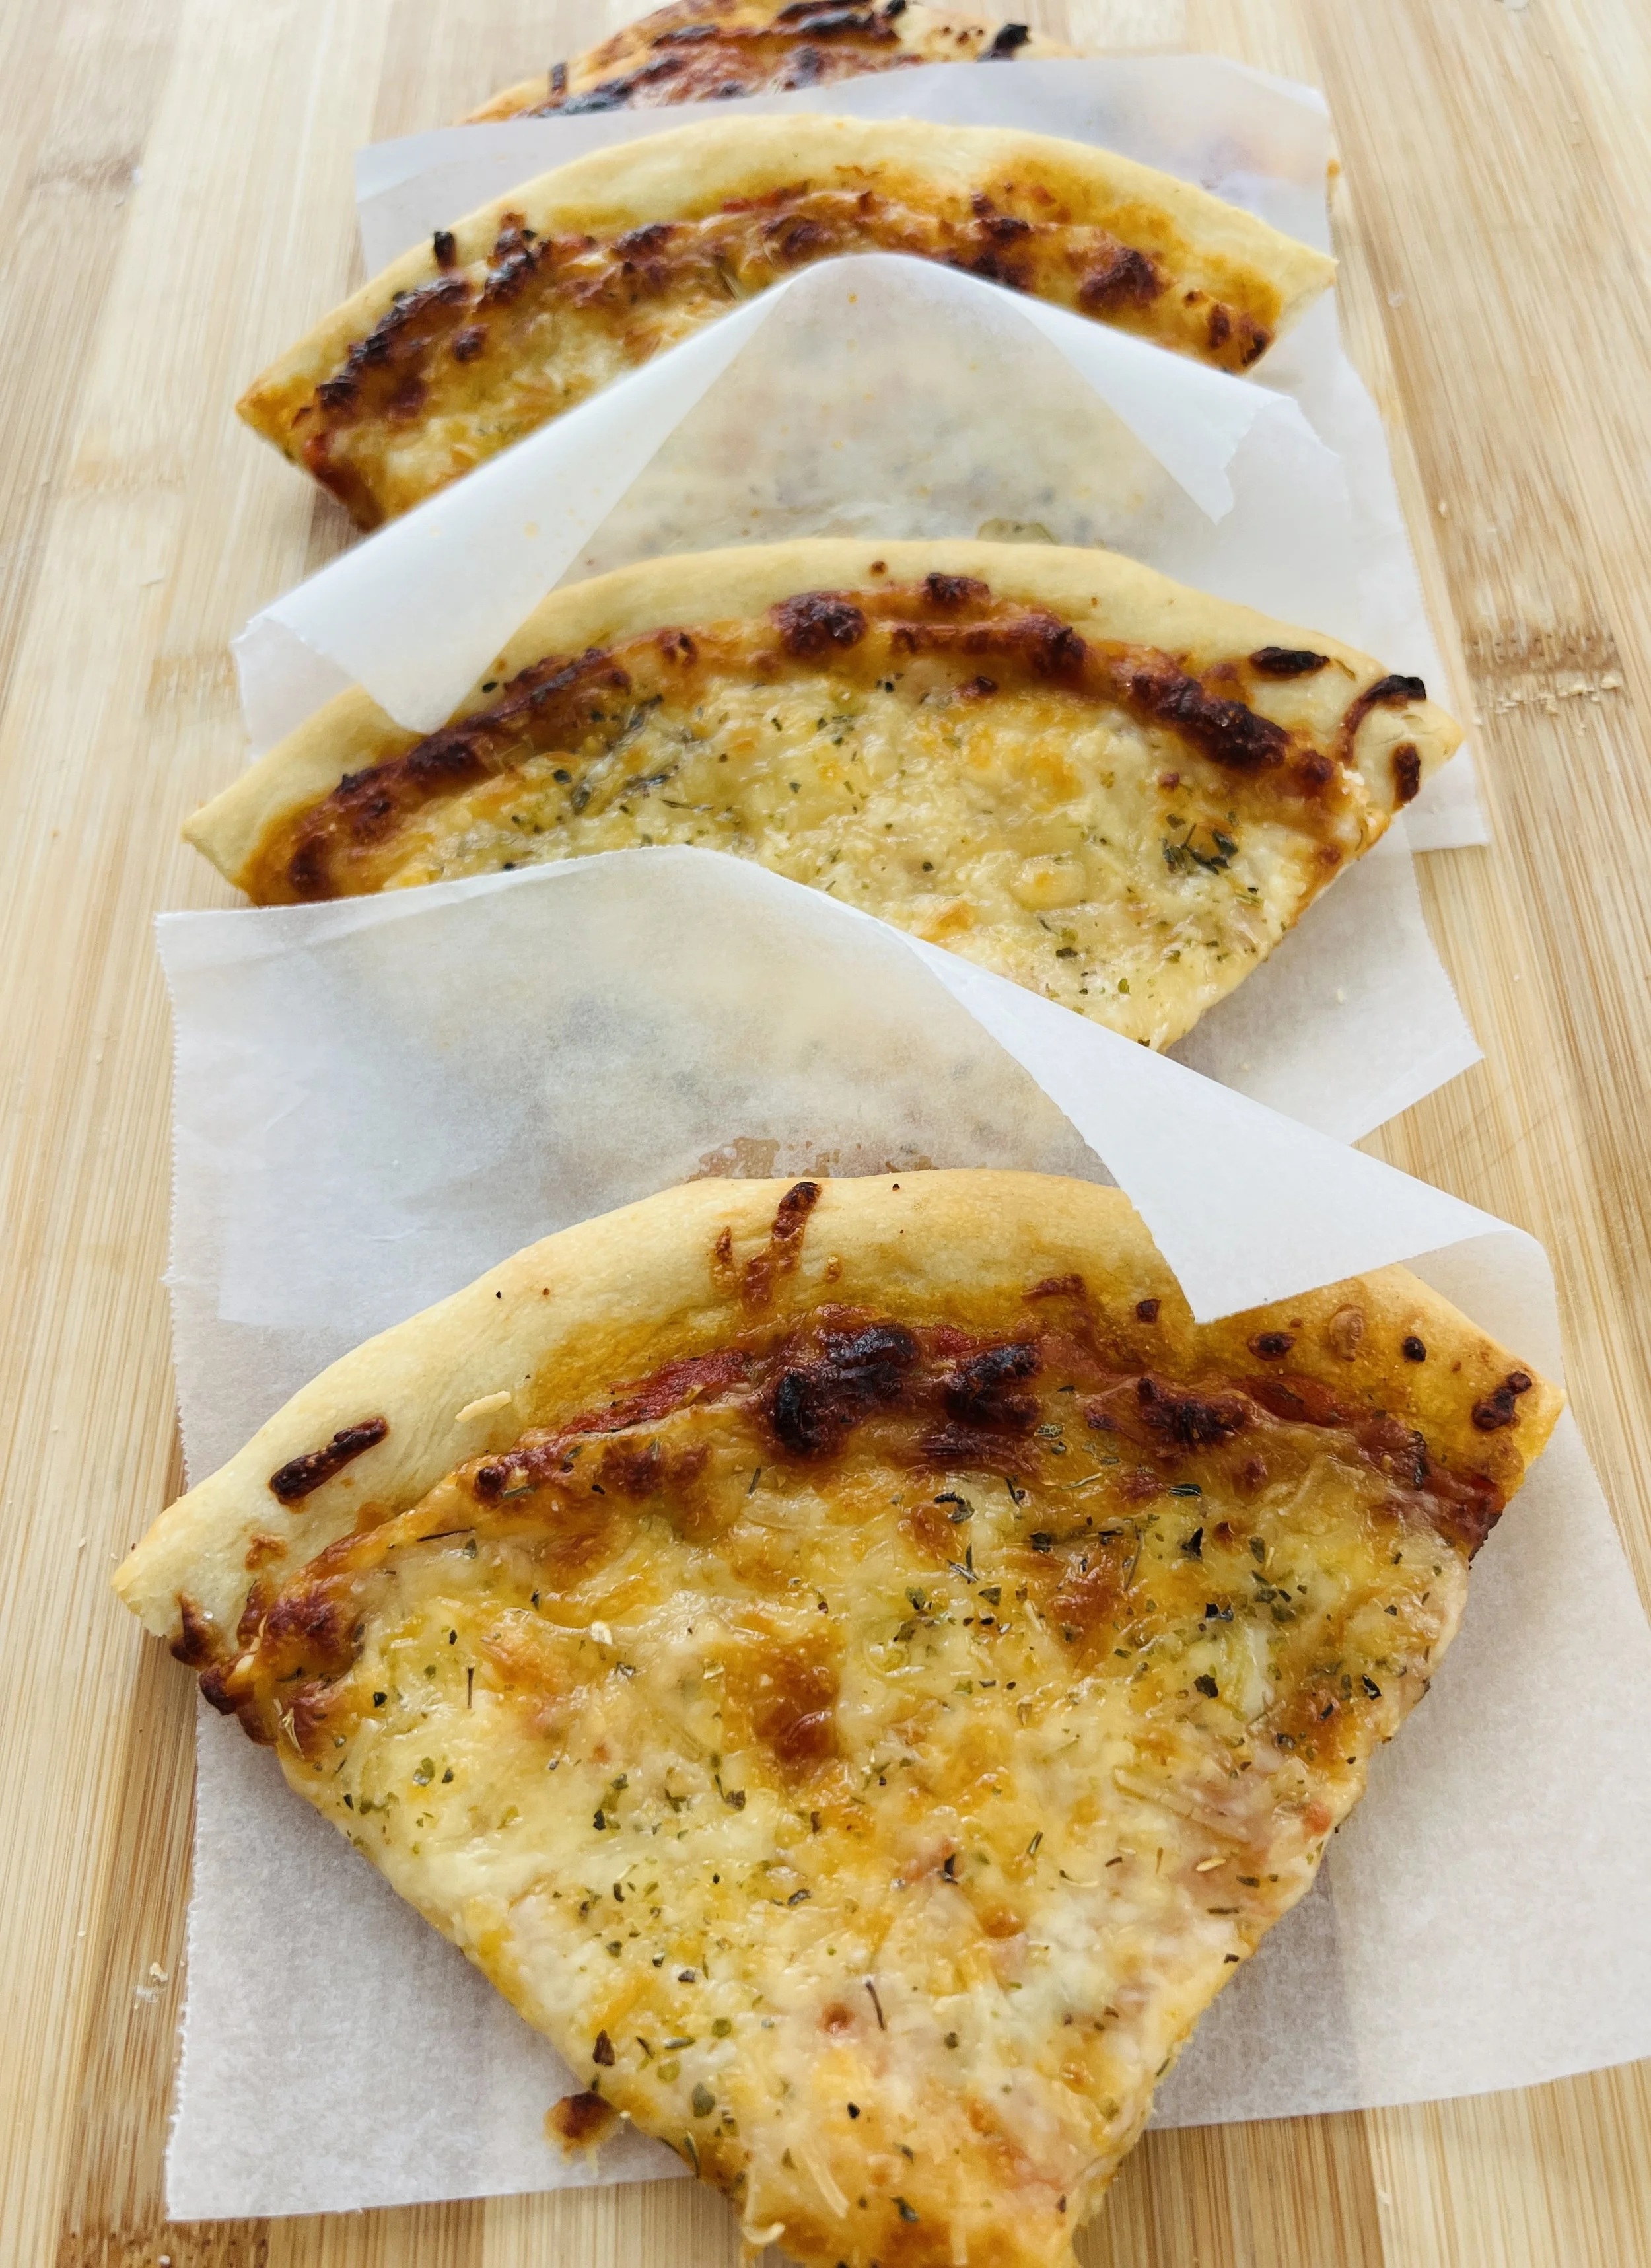
Roll or stretch the dough into a 10-11” circle. Spread with sauce and top with desired toppings.

Dough rolled out on parchment - you can also use a pizza pan, sheet pan or pizza screen

Make sure that any cooked vegetables are well drained and that the pizza is not too heavily sauced - that can make the dough underneath soggy.

Bake for 12 - 14 minutes until the crust is golden brown. Brush the crust with olive oil for some extra shine


Comment

Cinnamon Sugar Breadsticks

Breadsticks - Sweet or Savory - The DoughDr Episode from 1/21/23

January 23, 2023

Hello Bakers!

Here is the recipe to match Saturday’s demo - Stuffed Breadsticks. The link to Saturday's show

We are focusing on bread, working from low hydrated doughs to more hydrated ones. Last week it was the lowest hydrated dough, bagels. They easy to handle, mix, shape and bake and I hope that you get a chance to bake a batch.
This week we are moving up 2% in hydration - the ratio of liquid to flour in a yeast dough - and making breadsticks.
Once mastered, these breadsticks are completely customizable. They can be made sweet or savory - there are so many possibilities. I will make a few suggestions at the end of the post but I know you are creative and you will come up with some amazing stuffed breadsticks. Please tag me in those photos - I love to see your beautiful work.
Enjoy your baking!
Colette

Breadsticks - Mise en Place - so many possibilities

Breadsticks - can be Savory or Sweet

Equipment: Stand mixer fitted with the dough hook, scale, bowl scraper, parchment paper, rolling pin, ruler, spatula

230g water 80 degrees
7g yeast
400g Flour
12g Vegetable oil or Olive oil
21g butter, softened
12g sugar
8g Salt

For savory breadsticks: 1-2 ounces olive oil
For sweet breadsticks: 1-2 ounces melted butter

The dough ready for bulk fermentation

  1. Combine the water and yeast in the bowl of a stand mixer fitted with the dough hook. 

  2. Stir to combine.

  3. Let sit for 5 minutes.

  4. Add oil, flour, sugar, butter and salt.

  5. Mix on speed 2 for 2 minutes and then on speed 1 for 2 minutes.

  6. The dough can stay in the mixer bowl to bulk ferment or it can be transferred to a lightly oiled or buttered bowl. Cover the top of the bowl with plastic wrap.

  7. Bulk ferment - let rise until doubled in volume for 60-90 minutes.

  8. Remove dough from bowl.

  9. Roll the dough out to a 10”x14” rectangle onto a piece of parchment paper.

  10. Make sure the corners are squared off and the sides are straight.

  11. Spread filling on 2/3rds of the dough all the way to the short and long side.

  12. Fold the plain (unfilled) top (long edge) of the dough on top of the filling.

  13. Fold the filled edge over the filling. Use the parchment paper to help fold.

  14. Remove the parchment paper. Cover the dough with plastic wrap and let sit for 5-7 minutes so that the gluten relaxes.

  15. Roll the dough so that it measures 6” x 14”.

  16. Using a ruler, mark 1” increments.

  17. Using a pizza wheel to cut 1” strips.

  18. Twist the sticks and place on the prepared pan.

  19. Cover and let proof for 30 minutes. Preheat the oven to 375 degrees.

  20. Mist with water, lightly, before baking.

  21. Bake for 25 -30 minutes or until they are a deep golden brown.

  22. Brush with olive oil or melted butter as soon as they come out of the oven. 

Once you master the techniques - here are some flavor combinations:
Savory: Pesto, olive tapenade, roasted garlic paste and asiago cheese
Sweet: Nutella and finely chopped toasted hazelnuts, Biscoff Spread and crushed Biscoff cookies, chocolate babka filling and streusel.


Comment

Bagels are easy to master, you can freeze extras and never have to eat a puffy supermarket bagel again.

Bagels - Our Lowest Hydrated Dough...

January 16, 2023

Hello Bakers,

We had a great show on Saturday. Here is the link to the archive in case you missed it. Saturday's Show

Asking the questions on Wednesday is working so well! Our Bread Series on Saturday - low hydration to high hydration doughs - so exciting - I love this way to teach bread baking.
We started with bagels at 58% hydration. The great thing about starting with low hydrated doughs if you are starting out with bread making  or maybe coming back to it after a while.
This dough is so accessible - it comes together beautifully - the bulk fermentation stage (when the dough sits in a warm spot and doubles in size) is clear as is the proofing stage so bagels are a great bread to make at home. AND they taste so good - so much better than anything you buy in the grocery store. These bagels freeze great too - wrap them well and freeze them for up to one month.
Thaw at room temperature (thawing overnight works great) and then toast - oh so good!!!!
I hope you are inspired by this bread series and please tag me on IG - I love to see your beautiful bakes.

Equipment:
Stand mixer fitted with the dough hook, scale, bowl scraper, half sheet tray, parchment paper or silpat, veg oil or pan spray, medium to large pot for boiling the bagels, spider, slotted spoon or skimmer.
Yield 6 bagels - this recipe can be scaled up

Bagel MEP

244g water (80 degrees)
4g (1 teaspoon) Instant yeast or active dry
8g (2 teaspoons) vegetable oil
8g (2 teaspoons) honey
420g bread flour - I have used both King Arthur Bread Flour and Bread for Bread by Gold Medal
8g salt

Boiling Liquid
2 quarts water
50g honey, brown sugar or malt syrup
16g baking soda (optional) - this gives the bagels a deep golden brown bake - if you like you bagels to have a lighter bake then don’t use the baking soda

   Make space in your refrigerator for the tray of shaped bagels.

  1. Combine water and yeast in the bowl of a stand mixer, fitted with the dough hook. Let stand for 5 minutes.

  2. Add oil, honey, bread flour and salt.

  3. Mix on speed 2 for 3 to 4 minutes

  4. Change to speed 1 and mix for 4 more minutes. The dough will be tough and not sticky.

  5. Let rise, covered, at room temperature for 1 hour to 1 hour and 15 minutes.

  6. Divide the dough into 113 g portions. Depending on how you are shaping them, preshape into a short cylinder shape or a round cover and let sit for 7-8 minutes and then final  shape. Shape into bagels and place on a lightly sprayed parchment lined tray.

  7. Cover and let proof at room temperature for 15 minutes.

  8. Move to the refrigerator for 2 hours - no longer than 8. This chilling retards the bagels, slowing down the yeast and making sure the bagels don’t overproof when boiled.

  9. Preheat the oven to 450 degrees

  10. Bring water, honey or brown sugar and baking soda to a boil in a large saucepan.

  11. Boil the bagels for 30 seconds on each side, flipping halfway through.

  12. Remove, drain and return to the sprayed parchment paper lined baking tray.

  13. Top with sesame seeds, poppy seeds or everything seasoning.

  14. Bake for 17 - 20 minutes until the crust is shiny and a deep golden brown. Bake on the middle rack and spin the bagels halfway through if necessary.

  15. Bagels freeze for up to one month.

 Topping ideas: Poppy seeds, sesame seeds, caraway seeds, sea salt, cooked onions or hydrated dry onions.

Bagel Dough after mixing

Bagels boiled, topped and ready to bake


Comment

Bring on the bubbles - a healthy starter will have strong carbon dioxide activity.

Sourdough Basics! The DoughDr - First Episode of 2023!

January 09, 2023

Hello Bakers,
On Saturday’s episode the bulk of the questions were about sourdoughs, maintaining starters and breads. As the questions started coming in this week the vibe was all about bread. BTW - here is a link to the show - you can also find it archived on IG @ bakingwcolette. DoughDr Episode 1/7/23

There was a great question about hydration levels in breads from one of our bakers - this has inspired me to create a series of upcoming bread demos on the show teaching how hydration levels affect bread making - I polled the audience and got an enthusiastic response so we will be working low to high - starting with bagels - the lowest hydrated dough.
But first for those of you who are entranced by sourdough - the following is a tutorial for setting up a basic starter.

In this post, I want to show you how to start a sourdough starter in a simple and intentional way.

First ingredients and equipment.

So first - I want you to know that good quality bread flour is all you need. Most of the time, I am working with either Gold Medal Better than Bread or KA Bread Flour. Sometimes I order from Central Milling but most of the time I am using the brands that I can by close by - so don’t feel like you need anything special. BUT it does need to be unbleached and it will say so on the label.

And if you are starting your starter and you have read that rye flour is better to use at the beginning - it’s fine to start with rye. Rye flour is high in nutrients and fermentable sugars so it provides a great initial food source for the yeast.

Basic Bread Equipment:
1. Scale, set of bowls, stand mixer (very helpful), spatulas, dough scraper, sheet pans, parchment paper, serrated knife, spray bottle just for water, storage container for your starter - can be glass or plastic needs to be tall enough to contain the expanding starter, plastic wrap.
Bread Extras:
2. Bread (pizza) peel - here is a link to my favorite. Pizza Peel - it folds!
Lame - link to one I like Lame Example

Starting your basic starter - once it’s thriving - then you can transform it - make it wheat, rye, tight or loose - while maintaining a solid base.
To start your starter:

Choose a time that works for you - when you are in the thick of building your starter in the upcoming days - it will be every 12 hours.
Day 1: combine 50g of water (78 degrees) filtered is best - but tap can also be used and 50g bread flour (unbleached) or rye flour. Mix well and cover with piece of plastic wrap, secure the plastic wrap with a rubber band and leave out at room temperature.
Day 2: no feeding.

Day 3: Feed the starter 50g bread flour and 35g water. Mix until well combined. Cover and let sit 24 hours.
Day 4: Discard all but 75g of the starter - the discard is not usable at this time so compost it or throw it in the trash. Feed 50g of water and 75g of bread flour.
Day 5: Now the every 12 hour feedings start. Choose a time that works for you. I am an early bird so I feed my starter at 7:00AM and 7:00PM.

The pattern is every 12 hours, discard all but 50g of the starter and feed it 50g of water and 50g of bread flour. Store at room temperature, covered with the plastic wrap between feeding. More bubbles will begin appearing and it will start to look quite active.
Day 6: Discard all but 50g of the starter and feed 50g water and 50g bread flour.
Note: if you have started with rye flour - transition to bread flour starting on day 4.

The smell coming off the starter will be yeasty.
If there is any red liquid around the edges and it begins to smell bad - discard the whole thing and start over. Note: I have only had this happen once in all these years of sourdough baking! So it’s rare that a starter goes bad. The stinky red liquid comes from spoilage yeast microorganisms that haunt the mostly refrigerated environments - the same microorganisms that spoil long forgotten opened containers of ricotta and cottage cheese.


Back to building our starter. This is what we are looking for.

If you want me to check your progress - DM me a photo at bakingwcolette.
Next week on the show we will start our bread adventure working with hydration levels - low to high. First dough - bagels. For demo next week I will demonstrate the finished dough, shaping and the final bake. The recipe will then be published here on Monday morning.
Please join me next week at noon Pacific @bakingwcolette on Instagram.


Comment
Newer / Older
Back to Top

email: bakingwithcolette@gmail.com