• Home
  • Recipes and Blogposts
  • TheDoughDr Archived Episodes
  • About
  • Ingredient and Baking Videos
Menu

Baking With Colette

Certified Master Baker, Craftsy Instructor, Teaching you to bake your best!
  • Home
  • Recipes and Blogposts
  • TheDoughDr Archived Episodes
  • About
  • Ingredient and Baking Videos

Looking for a perfect bake? Search Recipe and Blogposts below:


Subscribe

Sign up with your email address to receive news and updates.

We respect your privacy.

Thank you!
I am a Craftsy Instructor. www.craftsy.com

I am a Craftsy Instructor. www.craftsy.com

Tweets by BakingwColette

Red Velvet Wedding Cake with Vanilla Bean Buttercream #nakedcake #pastrychef #amoretti #redvelvetcake #baking #laweddings Macaron madness at Art Institute - for Portfolio Show! Rose petal shells with Champagne buttercream and S'mores....#amoretti #macaron #pastrychef #baking
You made it to Friday - indulge with a chocolate chip scone...#5250 #pastrychef #baking #delicious Mini Apple Pies ready for the case at #5250 cafe! Fall baking is in full swing. #baking #fallbaking #apples #applepie #pastrychef #amorettiarmy Croissants fresh out if the oven at 5250 Cafe. #croissant #5250 #amoretti #pastrychef #baking #foodporn Tango Apple Cake with Caramel Icing - new recipe post at BakingwithColette.com. Get inspired for your fall baking today #apples #baking #cake#caramel Cranberry Orange Scones for 5250 Cafe.  Perfect with morning coffee.....Start your day with something sweet. #baking #amorettiarmy #baker #bakery##5250 Chef Rossi competing at Art Institute of Los Angeles - ACF category cold plating desserts :)
Go Chef!!!! #plated desserts There is a theory that Brioche a tete were modeled after Marie Antoinette's breasts -!if true then she was the patron saint of small breasted women. These are so yummy and delicious. #baking#marieantoinette #delicious #brioche#5250 #bread

Pampushky from Ukraine - soft, garlicky and delicious

Pampushky - Ukrainian Garlic Bread - Without the bite of the garlic #Bake for Ukraine

April 04, 2022

Hello Bakers,

Here is the recipe to match Saturday’s Garlic Blanching Demo on TheDoughDr.

Pampushky are soft dinner rolls from Ukraine that are drenched in garlic and herbs right as they come out of the oven. Typically sunflower oil would be used as Ukraine produces 80% of the world’s sunflower oil - but olive oil works well too. Give these a try. They are easy to put together and so delicious - the blanched garlic is full of flavor with none of the bitterness.

This is the first in our series of #BakeforUkraine recipes. Our next recipe will be Ukrainian Nut Roll - a request from one of our TheDoughDr. audience members. Please post and tag me if you make these pampushky - I hope you do. Any questions - let me know.

Happy Baking! Colette

Yield: 8 Rolls
Equipment:
Scale,Instant read thermometer, Stand mixer fitted with the dough hook, bowl scraper, 9”round cake pan (lightly oiled) - or 1/2 sheet pan lined with parchment, small saucepan for blanching garlic, strainer, chef knife
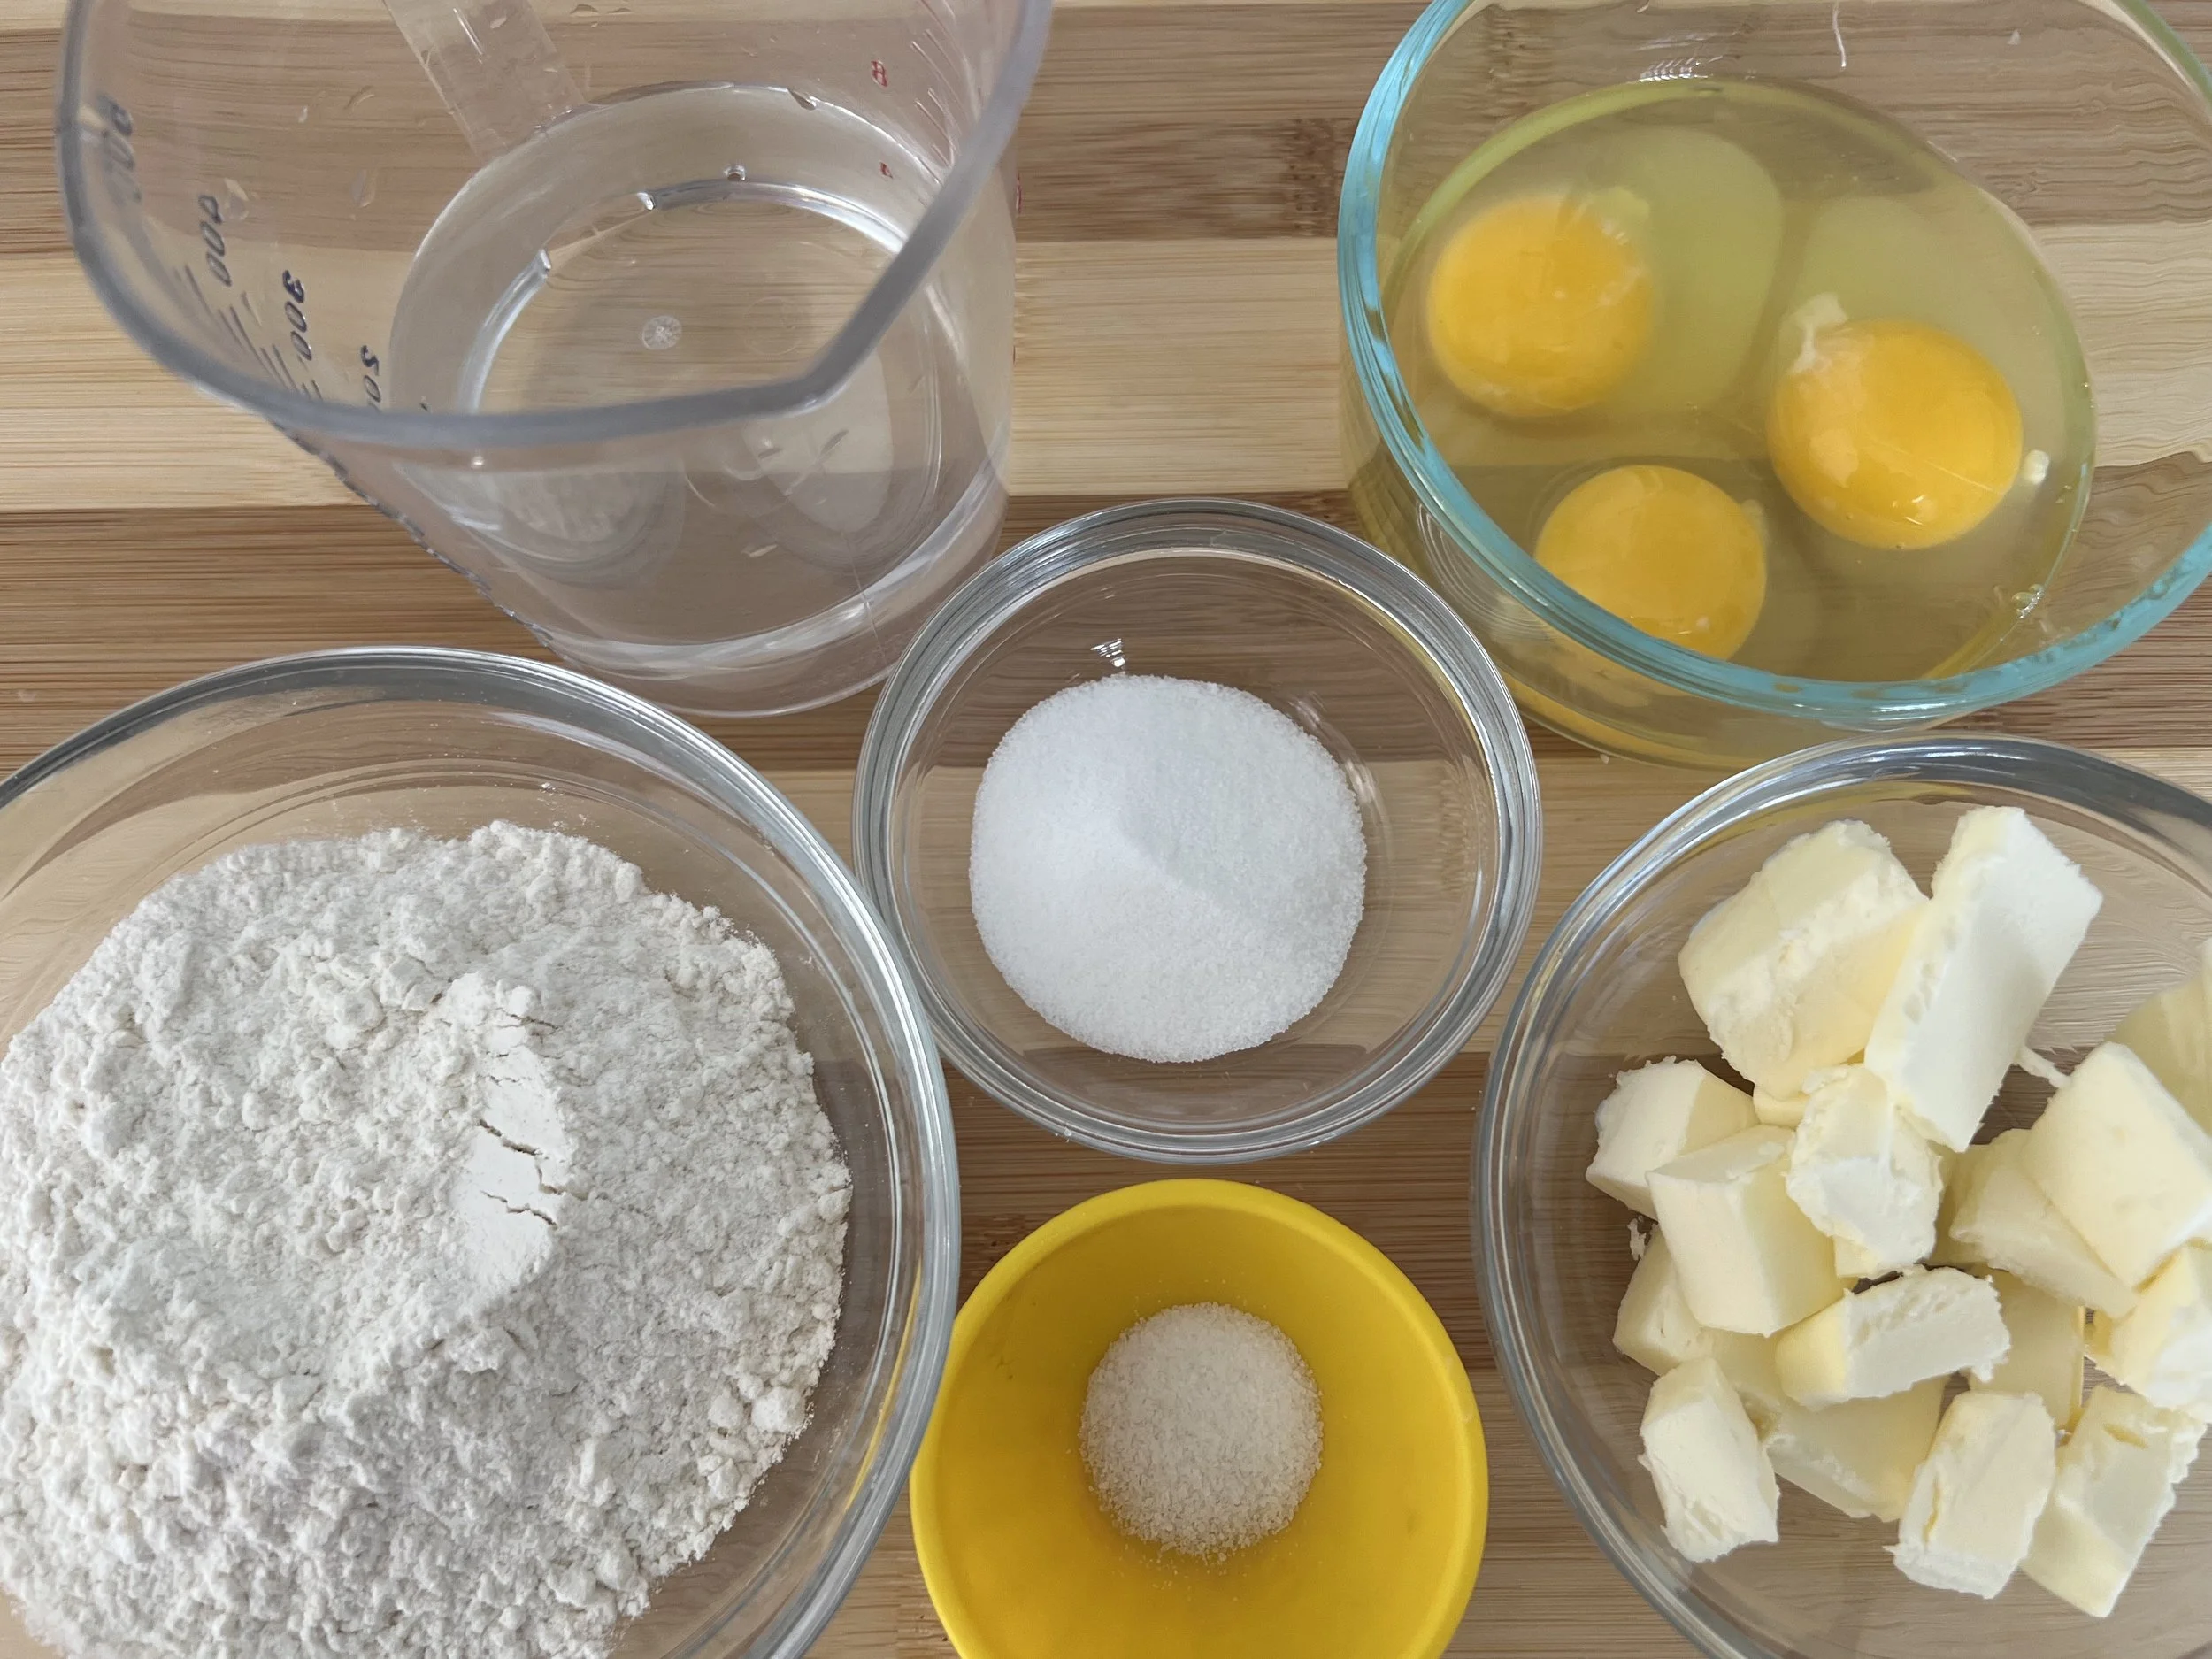
Ingredients:

227g (8 ounces) milk - 80 degrees
7g instant yeast (active dry can also be used)
28g sugar
28g vegetable oil, sunflower is often used - but olive works well
375g bread flour
8g salt

Pampushky MEP

Egg Wash: 1 egg beaten up with a pinch of salt until completely smooth

Scaled Dough

  1. Heat the milk to 80 degrees in the microwave (30 secs) or briefly on stovetop.

  2. Combine the yeast and the milk in the bowl of a stand mixer and let sit for 5 minutes.

  3. Add the sugar, oil, flour and salt.

  4. Mix on speed 2 for 3 minutes, stop the mixer to scrape down the bowl when necessary.

  5. Mixing on speed 1 for an additional 3 minutes.

  6. Remove the dough from the mixer - smooth and round - place in a lightly oiled bowl, cover with plastic wrap and set a timer for 90 minutes. Unless your kitchen is very warm - in which case check the dough in 75 minutes.

  7. Remove the dough from the bowl - gently degas (press the air out).

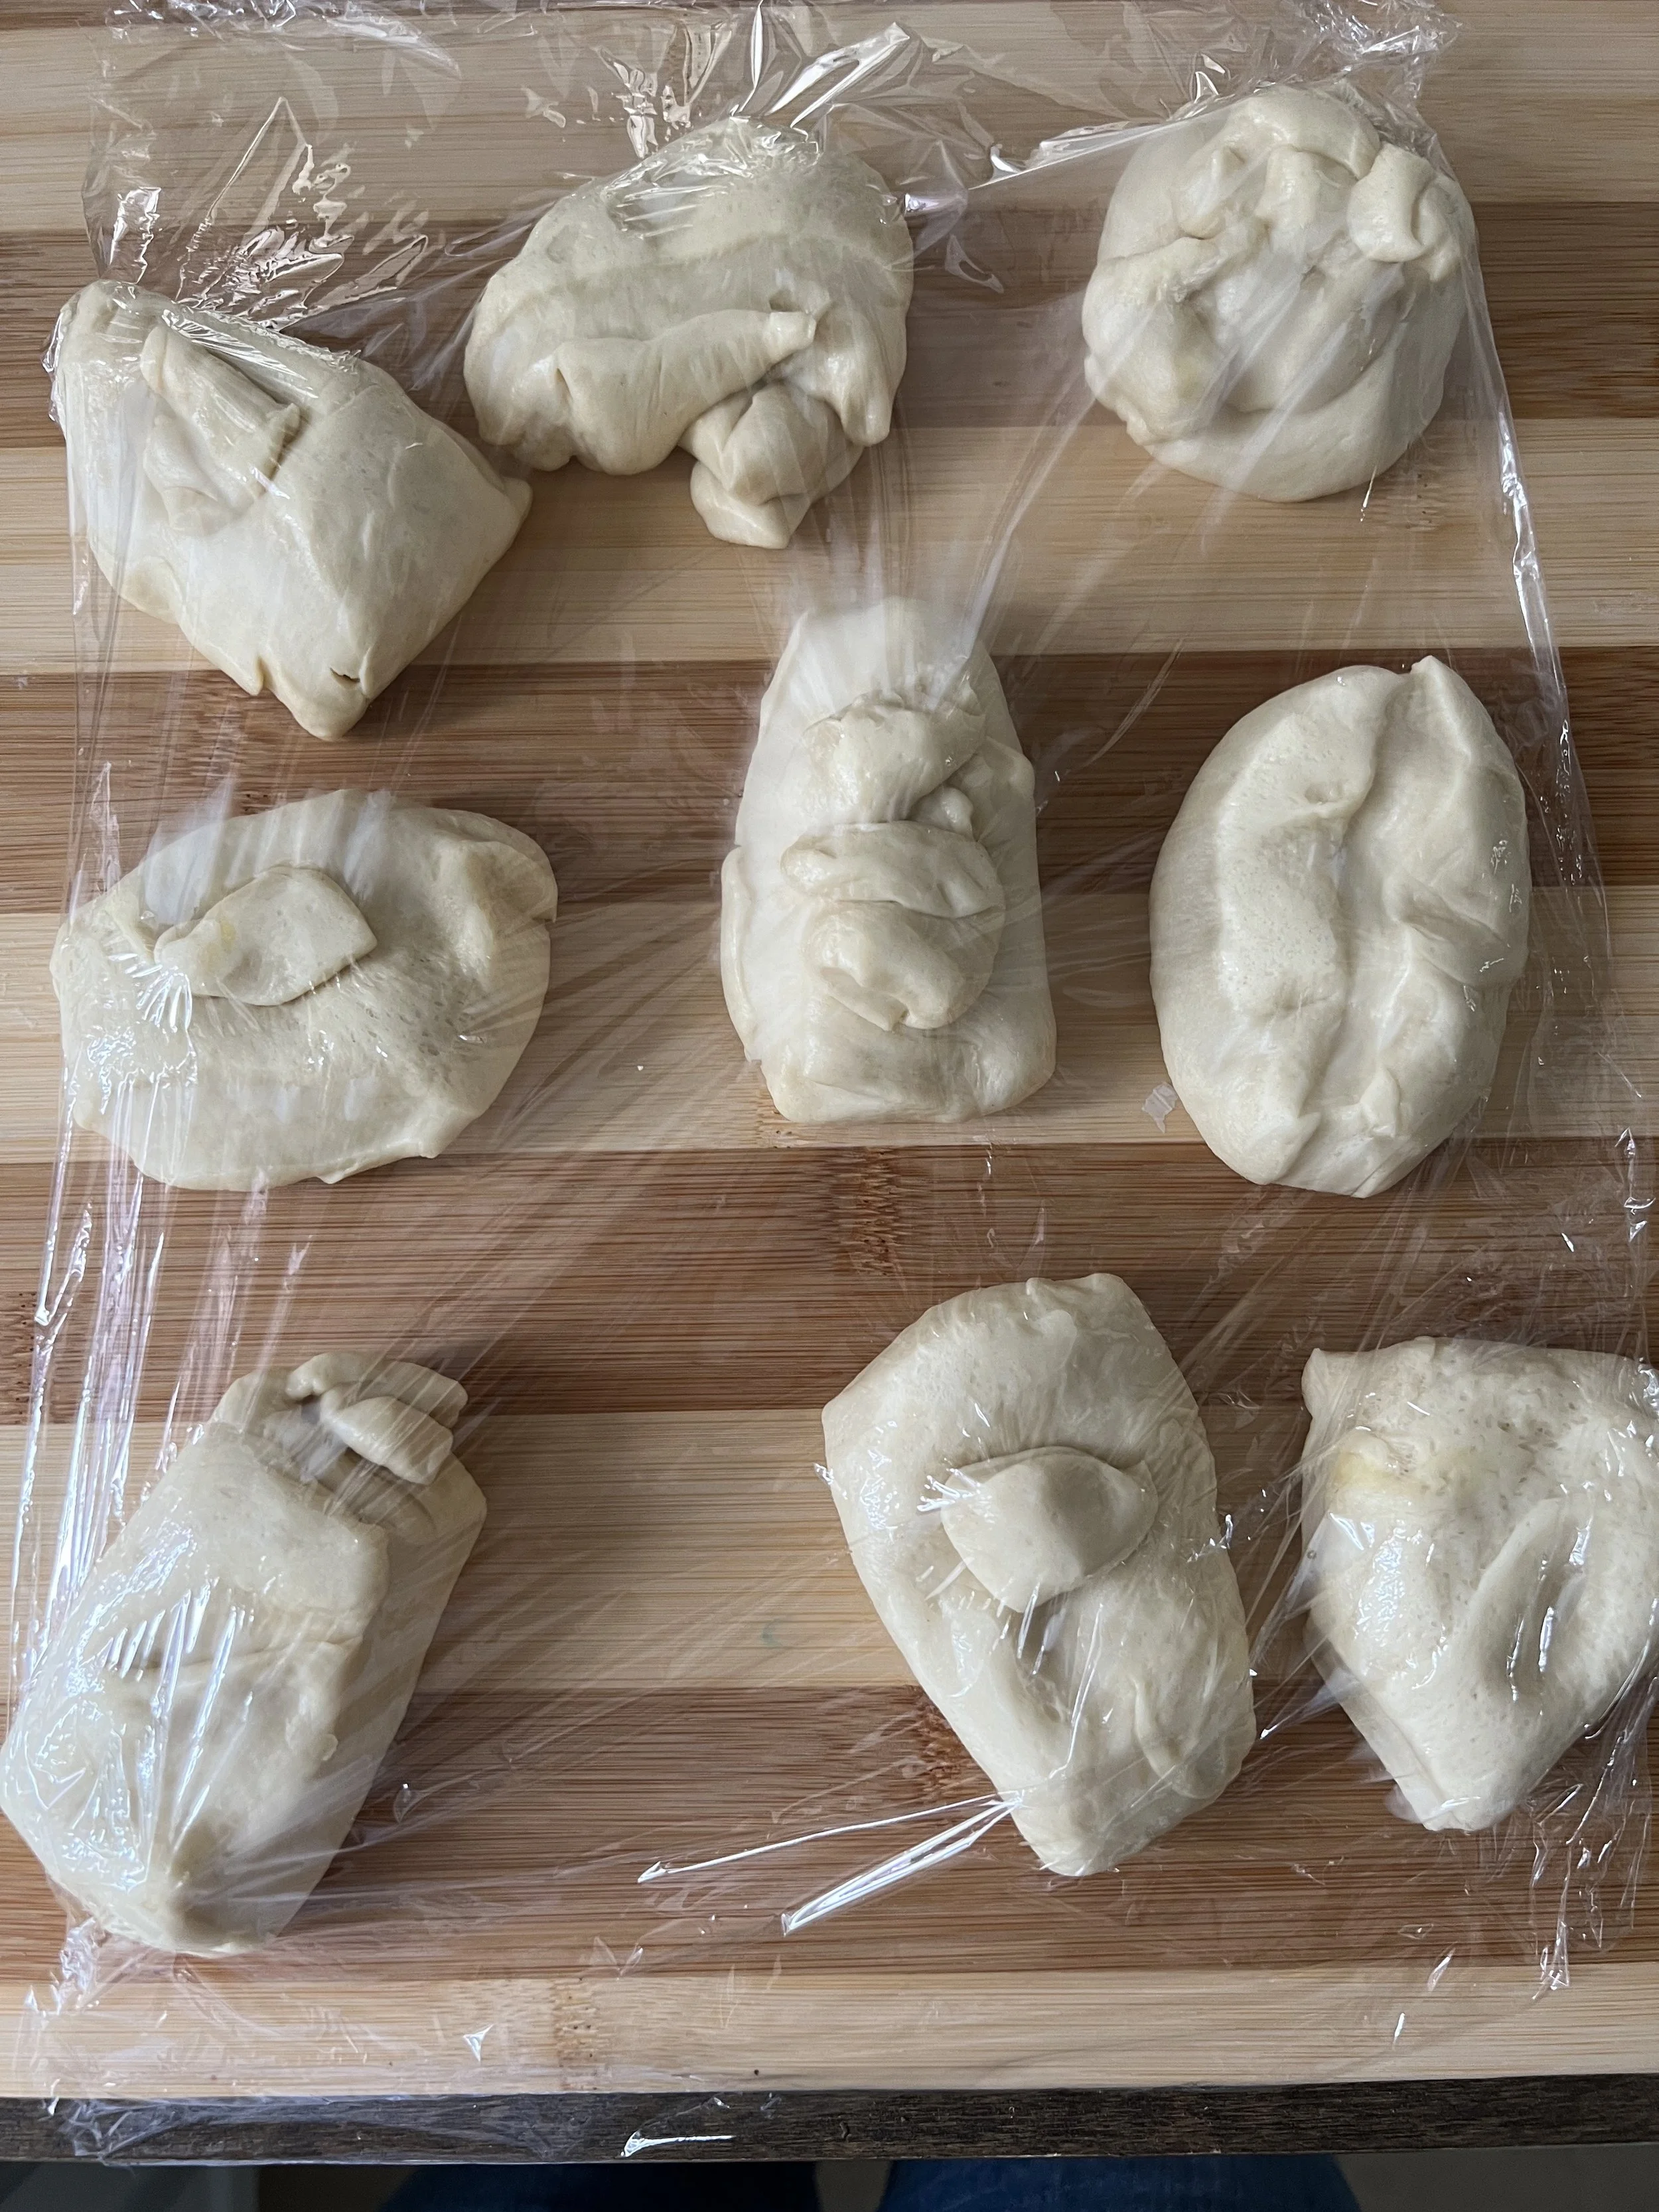
  8. Weigh the dough and divide into 71g pieces. The dough dividing can be eyeballed but make sure they are as even as possible. Lightly round the rolls, cover and let sit for 10 minutes.

  9. Reroll nice and tight as per the demo below and place 8 in lightly oiled cake pan. If using an 8” pan - there may be extra dough.

  10. Cover and let sit at room temperature until they look slightly puffy - are about 60 percent larger than before they started proofing and when you squeeze their sides (gently) your finger imprint stays. Typically they take an hour to get to this point. If you have the XL Ziploc bags - use them and if using the Brod and Taylor proofer - use with humidity and set to 82 degrees.

Roll Rounding Demo

Proofed Rolls - proofing time 1 hour and 15 minutes

12. Prepare the egg wash. Egg wash the rolls and bake in a 375 degree oven for 20-25 minutes. What you are looking for is a beautiful golden brown crust and a full bake.

1. Blanch the garlic in boiling water for 30 seconds - changing the water and bringing it back to a boil each time. Drain, cool and chop.
2. Combine oil, chopped garlic and herbs
Enjoy!! Freeze leftover rolls, thaw and refresh in a 350 degree oven for 5 minutes before serving.


Comment

Saint Patrick's Day Macarons - Shamrock Reboot 2022! (Copy)

March 14, 2022

Happy Saint Patrick’s Day Baking!

On last Saturday’s episode of The DoughDr - we had three great questions about macarons - leading me to think that it was time to reboot the Shamrock macaron with a simple ganache filling. If you made the eclairs from a few posts back you might have some ganache leftover.

This reboot includes a stripe of food color to make them pop and a way to get the Shamrock macaron template to you easily. No emailing me and waiting the link will be here - right here. Link to Shamrock template.

https://docs.google.com/document/d/1DDdOAQ-Nw5ZR4L8yjHBEydeazkv2jZ1dQVcYj6bv4nQ/edit?usp=sharing

Here is a helpful tip - if you are troubleshooting macarons - make a half batch - the technique is exactly the same - just less ingredients to go through if you have a batch that is not as successful.

Note: I used a few videos from the previous 2019 - that’s the reason for the different kitchen setting and lighting.

And if you want a more detailed explanation - please check out my Craftsy class Miniature French Desserts: https://www.craftsy.com/class/miniature-french-desserts-macarons-madeleines-more/

Equipment: Stand mixer fitted with the whisk attachment, spatula, large bowl, piping tip (Wilton #12), piping bag, sheet pans, parchment paper and silpats

Ingredients: Half recipe is in parenthesis

198g (99g) powdered sugar

113g (57g) almond meal

113g (57g) egg whites

one pinch (1/8 tsp) cream of tartar

99g (50g) granulated sugar

4-6 (2-3) drops vanilla extract (no more than a half teaspoon)

Green food color (Wilton if possible)

Shamrock Macaron MEP

1. Line 2 (1/2 sheet pans) (1- if you are doing a half recipe) with parchment paper or Silpat mats.
2. Layer the powdered sugar and almond meal in a food processor or mini processor.
Pulse until the mixture looks like fine meal, about 15 seconds. Transfer to a small bowl. Set aside.
3. Place the egg whites and pinch of cream of tartar in the bowl of a stand mixer fitted with the whisk attachment. Make sure that the bowl and the whisk are impeccably clean.
4. Starting on medium speed, whip the whites with the cream of tartar until they look like light foam. The whites should not appear liquid. The foam will be light and should not have any structure.
5. Slowly rain in the granulated sugar, trying to aim the stream between the whisk and the side of the bowl. Turn the speed up to medium-high.
6. Continue to whip the meringue until it is soft and shiny. It should look like marshmallow creme.
7. Add the gel color and the vanilla.
8. Staying at medium-high speed, whip the egg whites until the mixture begins to dull and the lines of the whisk are visible on the surface of the meringue.

9. Check the peak. It should be firm with the angle supporting the peak at 11:30 as shown on video. Transfer the whites to a medium bowl.
10. Fold in the almond meal mixture in three increments.
11. Paint the mixture halfway up the side of the bowl, using the flat side of a spatula. Scrape the mixture down to the center of the bowl.
12. Repeat two or three times, then check to see if the mixture slides slowly down the side of the bowl.

Optional: If you want the tie dye effect - stripe a line of color down the seam of the piping bag, starting in the tip - a skewer works well to draw in the color.

There is the 11:30 peak

13. Put the mixture in a piping bag fitted with one of the tips listed above. Pipe on the prepared baking sheets.
14. Slam each sheet hard four to six times on the counter. Then fist bump each end of the sheet’s underside twice.
15. Let the unbaked macarons dry until they look dull. Drying time depends on humidity. In a dry climate, the macarons can dry in 30 to 35 minutes. But never let them dry for more than an hour.
16. While the macarons are drying, preheat the oven to 325
17. Bake one sheet at a time on the middle rack.
18. Check in 11 minutes. If the tops slide, then bake for 2 to 3 more minutes. The macarons should release without sticking. Check one or two. If they stick, put them back in the oven for 1 to 2 more minutes.

Ganache Filling - with optional Bailey’s Liqueur -
6 ounces (170g) semisweet chocolate - chopped if not using chips - Ghiradelli 60% cacao chips work well
6 ounces (170g) heavy cream
Optional: to taste - Bailey’s Irish Cream Liqueur -1-2 Tablespoons is usually enough

Place chocolate in a heatproof bowl
Bring cream to a low boil and pour over chocolate
Let sit for 1 minute and then stir with a spatula - add Bailey’s to taste if desired
Let sir for 1-2 hours until it sets up to a pipable consistency

Finishing Shamrock macarons

  1. Arrange macarons by size, flip one macaron over so that flat side is facing up, pipe ganache on flat side and top with second half. Refrigerate for a few hours or overnight in an airtight container before serving. A little time in the refrigerator helps them achieve their distinctive - chewy in the middle and crisp in the middle texture. Enjoy!


Comment

Eclairs - filled with Vanilla Pastry Cream, dipped in Ganache and garnished with optional Crispy Pearls

Eclairs! A Sweet Treat - Easy to Make and Delicious

March 02, 2022

Hello Bakers!

When was the last time you bit into a sumptuous eclair? Take a moment and remember - the crisp but soft at the same time, pastry, the rich vanilla scented pastry cream and the rich chocolate glaze - worth your time and the calories - oh absolutely.

I say - more Pate a Choux in 2022! Let’s start with Eclairs

Making eclairs is really quite easy. They are best made a few hours before serving but that doesn’t mean you can make the components one to two days ahead. The one thing about baked but still empty pate a choux is that it needs to be stored in the freezer then thaw and refresh in a 350 degree oven for 5 minutes.

If you want to explore pate a choux in more depth.

I have a detailed Pate a Choux demo in my Craftsy class French Pastry Shop Classics https://www.craftsy.com/class/french-pastry-shop-classics/ It’s amazing all the desserts that are packed into that class.

Try these - they are so delicious - you may have forgotten how good they are.

Any questions - let me know. Happy Baking! Colette

Equipment
2 medium bowls
Medium saucepan
Whisk
2 spatulas
Strainer (only needed if pastry cream appears lumpy after cooking)
Baking sheet lined with plastic wrap or bowl of ice water for cooling down the pastry cream
Paring knife, if using the vanilla bean
Ingredients
13 ounces (369g) of whole milk
2 ounces (57 g) sugar (sugar #1)
1⁄2 vanilla bean, 2 teaspoons vanilla bean paste, or 2 teaspoons pure vanilla extract
2 ounces (57 g) sugar (sugar #2)
31⁄2 tablespoons (36 g) cornstarch
3 ounces (85 g) milk
4 egg yolks
1 ounce (28 g) unsalted butter
Method
Pour the 13 ounces (369 g) milk into a saucepan. Add the first 2 ounces (57 g) of sugar.
If using the vanilla bean, split it in half lengthwise with a paring knife, carefully scrape the seeds into the saucepan with the milk and first sugar. If using the vanilla bean paste add 2 teaspoons to the milk and the first sugar in the saucepan. If using vanilla extract add 2 teaspoons after the pastry cream is removed from the heat at the end of cooking
Place the saucepan on medium heat and bring to a low boil.
While the milk is heating, in a separate bowl, combine the cornstarch to the remaining vanilla sugar. Stir until well combined. It should look like fine dust.
Add the 3 ounces (85 g) of milk and the egg yolks to the sugar and cornstarch mixture.
Pour half of the boiling milk into the cornstarch mixture, and then quickly pour the egg-milk mixture back into the saucepan. It is important to bring the egg mixture up to the temperature of the milk so that the eggs don’t scramble.
Using the whisk, gently stir the egg-milk mixture over medium heat as it thickens, then whisk briskly until smooth. Cook for 1 minute once the mixture has thickened. Remove from heat.
Add the butter and the vanilla extract, if using.
The mixture should look smooth, but if you see any sign of lumps, strain the mixture.

Alternatively, the pastry cream can be poured into a clean bowl and placed over an ice water bath. Press a piece of plastic wrap over the surface and stir often
Pastry cream must be refrigerated. It has a shelf life of 2-3 days. 

Pastry Cream

Yield:
20 ounces (567g) or 21⁄4 cups (slightly less when strained)

Pastry Cream MEP

Pate a choux

Yield: 10 - 12 Medium Eclairs

Equipment
Medium saucepan
Wooden spoon
Spatula
Stand mixer with paddle attachment
Measuring spoons
Scale
Piping bag
Plain round or star tip (Ateco 806 or 826#)
2 or 3 baking sheets lined with parchment paper

Ingredients

Pate a Choux MEP

6 ounces (170g) water
3 ounces (85 g) unsalted butter, cut into cubes
1 ounce (14 g) sugar
1/4 teaspoon salt
3 1/4 ounces (106g) all-purpose flour
3 eggs

Method

Preheat the oven to 375°F (190°C/gIn a saucepan, bring the water, butter, sugar, and
salt to a rolling boil.
Add the flour all at once. Stir over heat with a Ingredients wooden spoon or spatula, and cook until there is a film of starch on the bottom of the pan. This takes 2 to 3 minutes, keep stirring vigorously.
Transfer the flour mixture to a stand mixer, and beat on low speed until the steam dissipates and the bottom of the bowl is no longer hot.
Add the eggs , beating until fully incorporated. Mix on medium low speed for 1-2 minutes until smooth.

Pipe into the desired shapes onto parchment- lined baking sheets.

Bake for 20 minutes. Reduce the oven temperature to 350°F (175°C/gas 4), and continue to bake for 15–20 minutes. The pâté à choux should be a light golden brown overall not just on the surface but in the cracks.
Pâté à choux (unfilled) can be wrapped well and stored at room temperature for 24 hours or in the freezer for 1 month.
Unfilled pâte à choux can be thawed for an hour at room temperature and then refreshed in a 350°F (175C/gas 4) oven for 5-7 minutes.

Chocolate Glaze/Ganache

This topping for éclairs can also be used as a glaze for cakes and a filling for tarts and tartlets. Refrigerate any leftover ganache.
Yield: 340g

Equipment
Medium saucepan
Heatproof bowl
Spatula
Ingredients
6 ounces (170 g) heavy cream
6 ounces (170 g) semisweet or bittersweet chocolate (54 percent minimum cacao)
Method
Bring the cream to a low rolling boil in a medium saucepan.
Place the chocolate in a heatproof bowl, and pour the hot cream over the chocolate.
Let sit for 1 minute, then stir with a spatula until the ganache is smooth. It should look glossy and rich. Dip Eclairs while the ganache is fluid.

Fill and Garnish Eclairs
Eclair Components
12 éclairs
1 recipe pastry cream
1 recipe ganache, at room temperature
Method

Make 1 or 2 holes in the bottom of the eclairs with a 826 star tip and use a 825 star tip to fill - you can also make a hole with a paring knife.

Fill a 16-18” pastry, fitted with an 825 star tip with pastry cream.

Fill eclairs until the eclairs feel heavy.

Dip tops in ganache. Store finished éclairs in the refrigerator. Garnish with crispy pearls if desired. Refrigerate eclairs until ready to serve.


Comment

Finished Beignets

Beignets for Mardi Gras!

February 26, 2022

Hello Bakers,

A few weeks ago - I had a request to feature beignets on the blog for Mardi Gras. The request came on my show, The DoughDr - Saturdays at 12:00 PST on Instagram @BakingwColette.

Perfect, Beignets are easy - the dough goes together quickly - one bulk fermentation and the dough chills for a few hours or overnight - so the dough can be made ahead.

Once fried they are garnished with a snowfall of powdered sugar - sauce chocolate or dulce de leche is optional. Enjoy your baking and your Mardi Gras!

Equipment:
Medium to large pot for frying, deep fry thermometer, digital if possible, stand mixer fitted with the dough hook, scale, spider, pizza cutter, ruler, small baking lined with parchment paper for before frying, small baking tray lined paper towels for after frying.
Medium bowl for powdered sugar, strainer or powdered sugar dredger.

Fryer Set Up
Dutch Oven (minimum 4 quart)
Canola or vegetable oil (48 ounces) minimum
Thermometer to check oil temperature

Note***Oil for donuts can be reused several times if it is used to only fry donuts.
Let the oil cool and then strain - I use the original oil bottle to store my donut oil when cool.

Dough Ingredients
Yield: 32 1” Beignets

Beignet MEP

128g water (80 degrees)
85g milk
6g instant yeast
1 large egg (50g)
424g bread flour
8g vanilla (2 teaspoons)
57g sugar
28g unsalted butter
1g (1/2 teaspoon) salt
In a stand mixer fitted with a dough hook, combine yeast and water. Stir gently for a few seconds and let sit for 5 minutes
Add the remaining ingredients and mix on low speed for 4 minutes and then speed 2 for 2 minutes. Knead briefly by hand to smooth out the dough. It will be soft and pillowy.

Place the dough in a buttered bowl to bulk ferment or rise until doubled in size (about 1 hour at 72 degrees) can take longer if the kitchen is cooler. The dough will have doubled in size and have no springback when poked.

Gently degas the dough and place in a buttered bowl or buttered plastic bag. Cover and refrigerate overnight. If you want to make the beignets same day, chill the dough for a few hours and then proceed with the rest of the recipe.

Chill for a few hours or overnight in a Ziploc bag or in a covered bowl

After removing the dough from the refrigerator, place it on a light floured work surface and roll out into a rectangle 1/2” thick - it will measures approximately ______________. Try to square off the corners as best you can. Cut the dough into 1” squares - use a pizza cutter and a ruler to measure. Cover the dough with a piece of plastic wrap while the oil heats.
Heat the oil to 350 degrees and fry the dough squares six at a time until the are golden brown about 1 1/2 minutes on each side - flip with tongs or a spider.
Drain on paper towels and sprinkle heavily with powdered sugar while still warm.

Serve and Enjoy. Beignets are best the day they are made.


Comment
Newer / Older
Back to Top

email: bakingwithcolette@gmail.com