• Home
  • Recipes and Blogposts
  • TheDoughDr Archived Episodes
  • About
  • Ingredient and Baking Videos
Menu

Baking With Colette

Certified Master Baker, Craftsy Instructor, Teaching you to bake your best!
  • Home
  • Recipes and Blogposts
  • TheDoughDr Archived Episodes
  • About
  • Ingredient and Baking Videos

Looking for a perfect bake? Search Recipe and Blogposts below:


Subscribe

Sign up with your email address to receive news and updates.

We respect your privacy.

Thank you!
I am a Craftsy Instructor. www.craftsy.com

I am a Craftsy Instructor. www.craftsy.com

Tweets by BakingwColette

Red Velvet Wedding Cake with Vanilla Bean Buttercream #nakedcake #pastrychef #amoretti #redvelvetcake #baking #laweddings Macaron madness at Art Institute - for Portfolio Show! Rose petal shells with Champagne buttercream and S'mores....#amoretti #macaron #pastrychef #baking
You made it to Friday - indulge with a chocolate chip scone...#5250 #pastrychef #baking #delicious Mini Apple Pies ready for the case at #5250 cafe! Fall baking is in full swing. #baking #fallbaking #apples #applepie #pastrychef #amorettiarmy Croissants fresh out if the oven at 5250 Cafe. #croissant #5250 #amoretti #pastrychef #baking #foodporn Tango Apple Cake with Caramel Icing - new recipe post at BakingwithColette.com. Get inspired for your fall baking today #apples #baking #cake#caramel Cranberry Orange Scones for 5250 Cafe.  Perfect with morning coffee.....Start your day with something sweet. #baking #amorettiarmy #baker #bakery##5250 Chef Rossi competing at Art Institute of Los Angeles - ACF category cold plating desserts :)
Go Chef!!!! #plated desserts There is a theory that Brioche a tete were modeled after Marie Antoinette's breasts -!if true then she was the patron saint of small breasted women. These are so yummy and delicious. #baking#marieantoinette #delicious #brioche#5250 #bread
Strawberry Shortcake

Strawberry Shortcake

Strawberry Shortcake - Companion recipe to Ingredient Function Friday, Episode 16

February 16, 2018

Hello Bakers,

Happy Ingredient Function Friday! Here is this week's companion recipe. Our ingredient this week is heavy cream and strawberry shortcake is a perfect companion recipe. It is a little early for strawberries...they are just looking and tasting decent here in Los Angeles. I had some delicious berries last week and might have gotten a little carried away.

If they are not available in your area you could use frozen. I included the method for both fresh and frozen berries.

 Not only does this recipe use whipped cream but the shortcake biscuit is a cream biscuit. This is a delicious shortcake recipe - there is just a little bit of butter in it to encourage a little flakiness.

The first baker to post a photo of their finished strawberry shortcake will receive an 11" OXO balloon whisk. We have winners for all the other contests. I love the engagement! Thank you to all the bakers for baking and submitting photos. I hope you get to bake something delicious this President's day weekend, like these shortcakes...

Happy Baking! Colette


Start with the Biscuits:  Yield: 12 biscuits

Equipment • Half sheet pan lined with parchment paper • Large mixing bowl • Bowl scraper • Pastry blender (optional) • Sifter • Rolling pin • Biscuit cutter ( • Bench scraper or chef’s knife • Pastry brush

Ingredients:

Shortcake mise en place

Shortcake mise en place

  • 255g All Purpose Flour 
  •     2 teaspoons (8g) Baking powder
  •    1/2 teaspoons salt (2g) salt
  •    45g Granulated sugar
  •     57g Butter
  •    227g-255g (8-9 oz) Heavy cream 
  •       1 teaspoon vanilla
  1.  Line half sheet tray with parchment paper.
  2.  Preheat the oven to 375 F (190 C). For convection 350 F (180 C).
  3. Sift or whisk together dry ingredients in a large bowl
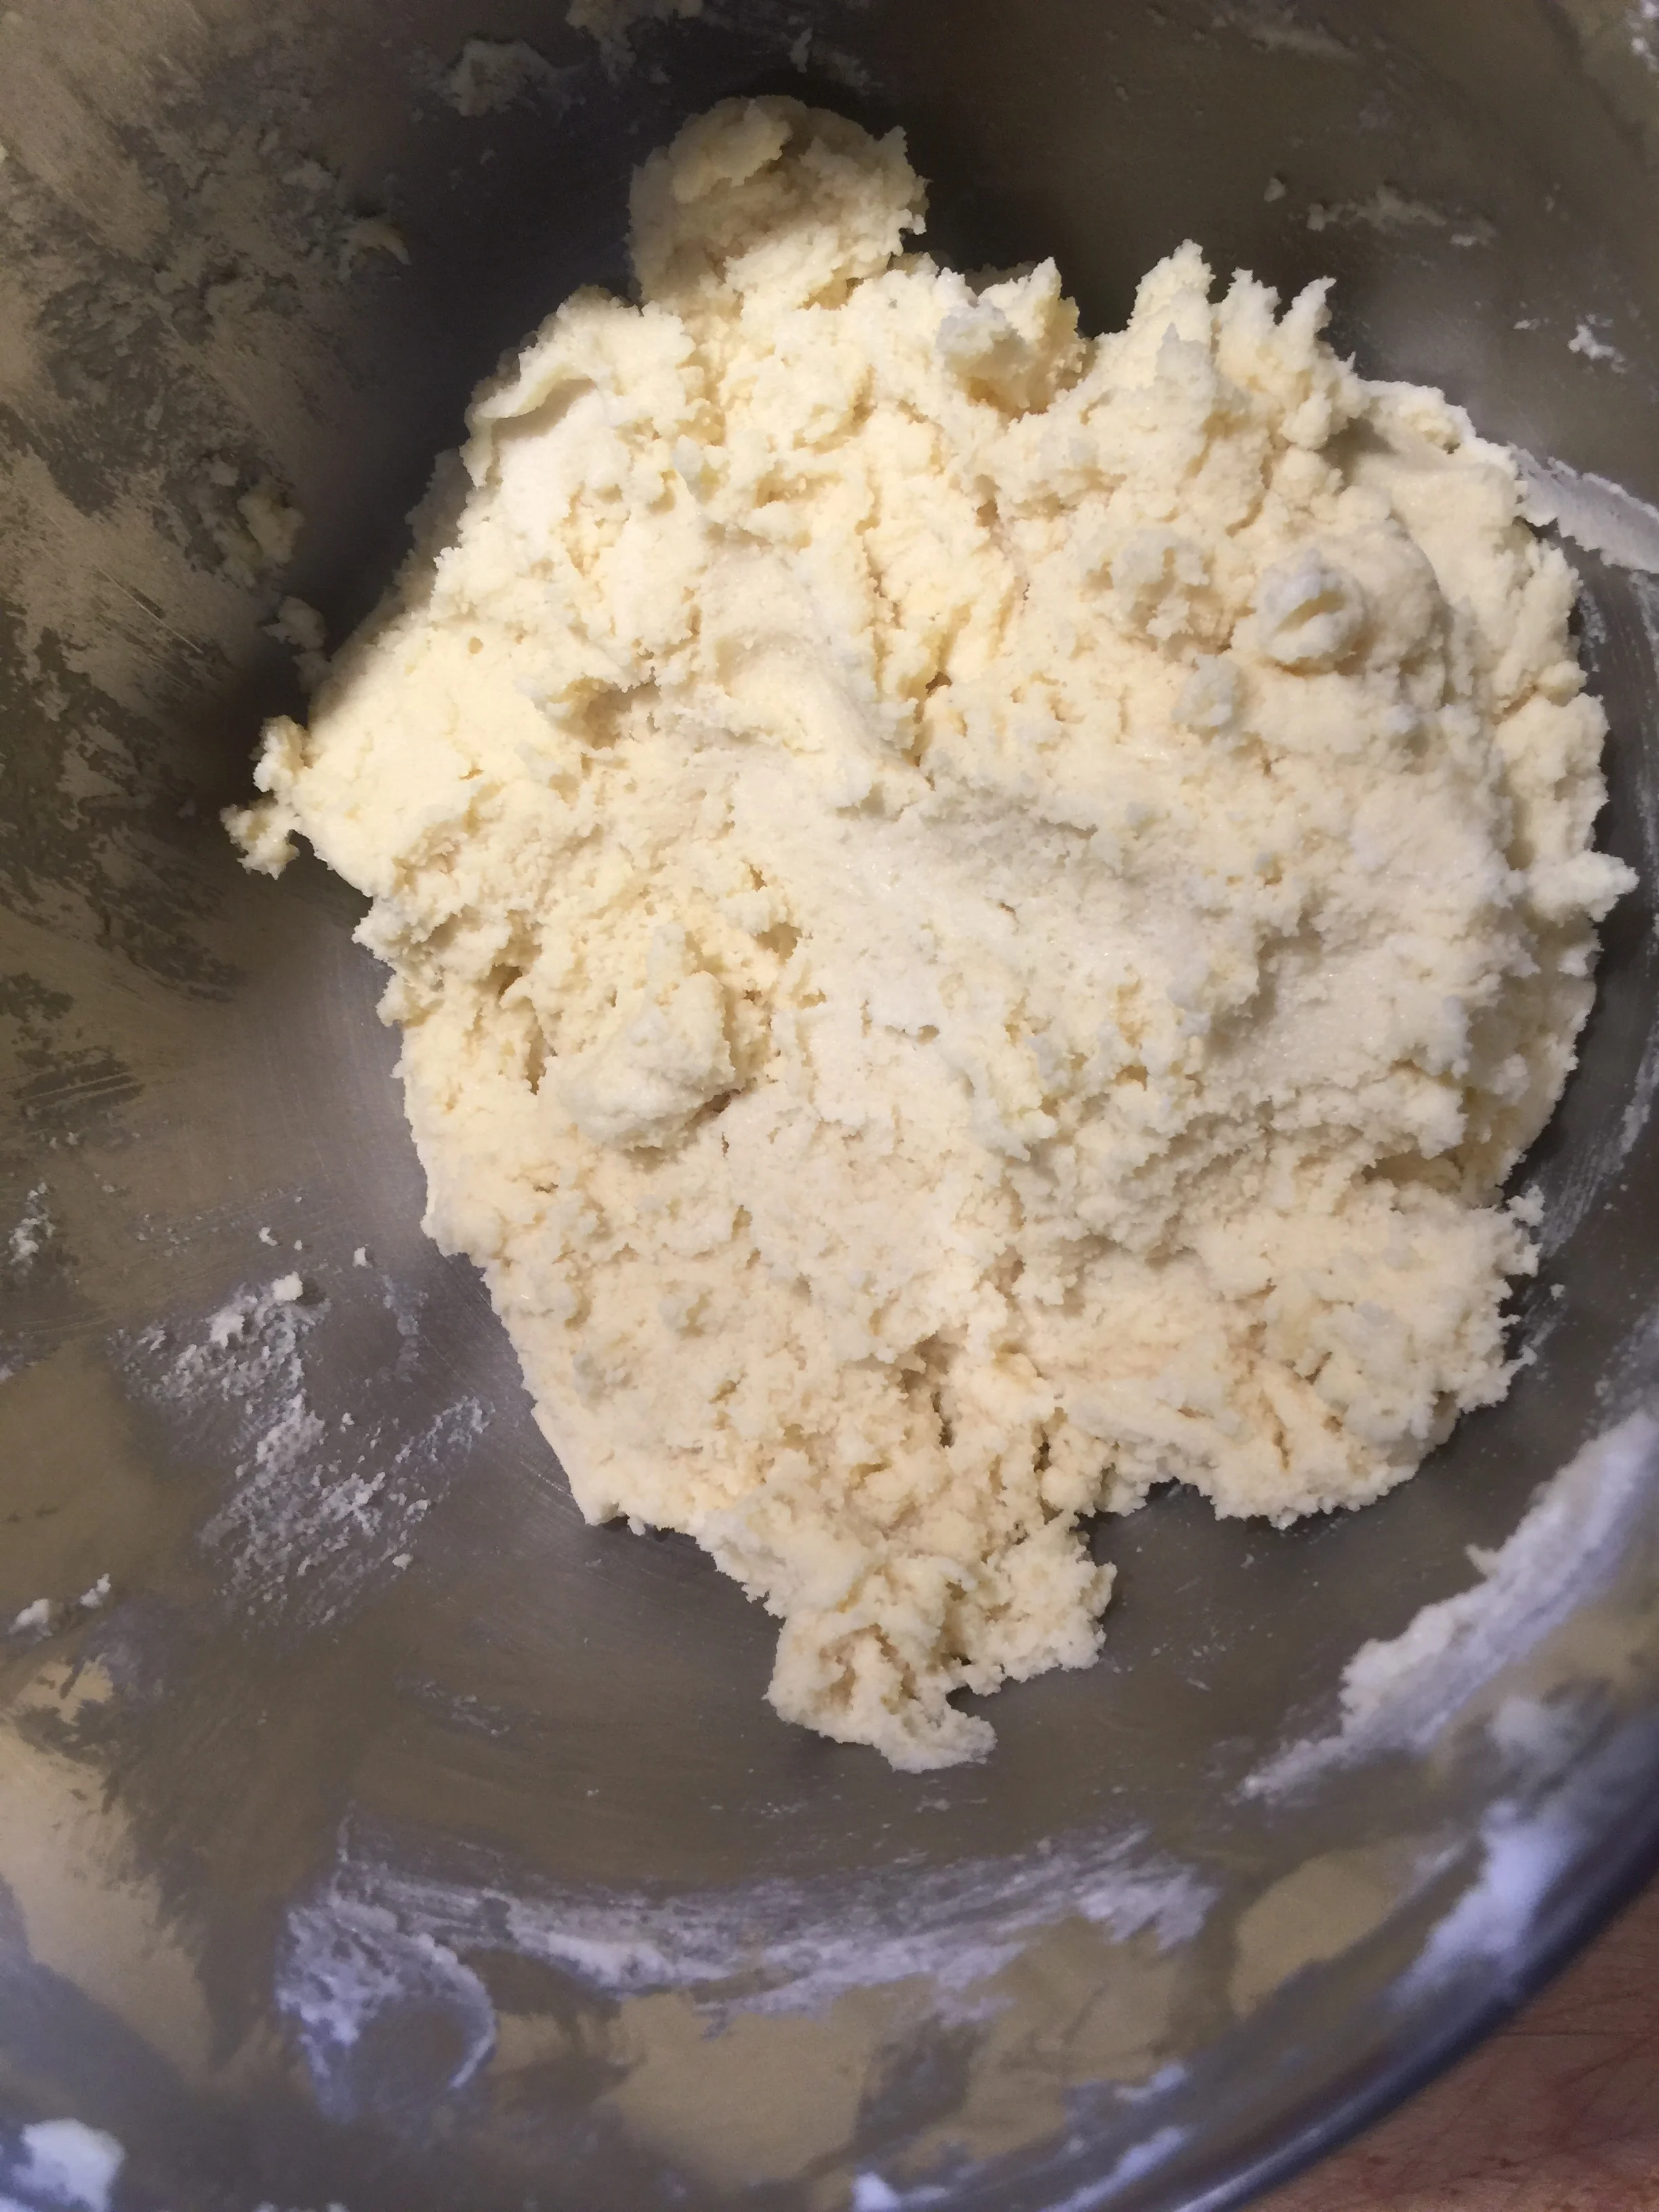
  4. Cut in the butter with a bowl scraper or pastry blender until the butter looks like coarse meal. 
  5.  Add the heavy cream and vanilla over the top of the dry ingredients, using the bowl scraper to push and fold the liquid into the flour. If it looks dry add a little more buttermilk (a tablespoon at a time) around the edge the bowl. ***Heavy cream is heavier then regular milk so it does not hydrate the same. You may have to add a little bit more to get the dough to come together.
  6.  Continue to mix and fold until all the dry ingredients are incorporated and there is no dry residue on the bottom of the bowl.
  7.  Turn the dough out onto a very lightly floured surface. It will seem rough but push the edges together, roll the dough into a rough rectangle and fold into thirds.Roll out dough to 1/2" thick. 
  8. Using a biscuit cutter, cut out as many complete circles as possible before having to re roll the dough. Re roll no more then twice. The more the dough is rolled the tougher the biscuits get. 
  9. Place the biscuits on prepared sheet pan, brush with extra heavy cream. Chill for 20 minutes in the refrigerator. Bake at 375 degrees for 14 minutes, 350 if using a convection oven. When done they will be golden brown and should feel relatively light when you pick them up. If they feel heavy, return then to the oven for a few more minutes.  The biscuits can be made ahead and frozen. To use: thaw at room temperature for an hour or two and then refresh in a 350 degree oven for 5 minutes.

Step by Steps Photos:

Cutting in butter

Cutting in butter

This is how it looks when it needs a little more heavy cream - pour on the side - it is easier to mix in.

This is how it looks when it needs a little more heavy cream - pour on the side - it is easier to mix in.

This is how the dough should look after it has been quickly smoothed out, folded into thirds and rolled out to 1/2" .

This is how the dough should look after it has been quickly smoothed out, folded into thirds and rolled out to 1/2" .

On the tray and ready to bake...

On the tray and ready to bake...

Light golden brown...

Light golden brown...

Macerated Strawberry mise en place

Macerated Strawberry mise en place

Macerated Strawberries

Paring knife, cutting board, medium bowl, fork

  • 1 pint Strawberries, washed, remove tops and quarter
  • 4 tablespoons sugar
  • few drops of lemon juice
Sugared strawberries....

Sugared strawberries....

1. Place strawberries, sugar and lemon juice in a medium bowl. Toss ingredients together. Cover and let sit for 20 minutes. Mash the berries lightly with a fork. Cover and refrigerate until ready to use.

**if using frozen unsweetened berries thaw them overnight in the refrigerator. Pour off most of the excess juice, quarter them (if they are whole) and proceed with the recipe.

Whipped cream

  • 8 ounces heavy cream
  • 1 .25 ounces (2 1/2 tablespoons powdered sugar)
  • 1 teaspoon vanilla

1. Whip cream until it is the consistency of yogurt, add sugar and vanilla. Continue whipping until soft but does not slide down the slide of the bowl. See video below.

To plate

  • Cut biscuit in half. Place bottom half of biscuit on plate.
  • Dust top half of biscuit with powdered sugar.
  • Spoon berries on biscuit bottom.
  • Top with whipped cream and powdered sugar biscuit top.


2 Comments
Snickerdoodles

Snickerdoodles

This is your new favorite cookie...Snickerdoodles

February 08, 2018

Hello Bakers,

This is the companion to this week's episode to Ingredient Function Friday and your new favorite cookie. This recipe comes from Chef Baker's Mom. Chef Baker, a great pastry chef and friend told me his Mom made them all the time growing up. The original recipe is from the Betty Crocker cookbook (1960s version.)

Chef Baker has long since scaled up the recipe and has used it in countless times at work. I scaled it down for you and it could be cut in half again. I am really grateful that he is letting me share the recipe with you.

They are quick and very easy to put together. The extra cream of tartar adds to the texture of this cookie. It just melts in your mouth. Chef told me that he often makes small ones and sandwiches them together with raspberry jam - these are called "jamdoodles".

Equipment: Stand mixer fitted with the paddle attachment or hand held mixer with standard beater, spatula, sifter, 2 1/2 sheet pans lined with parchment

Scoop (#24) 1.33 oz or scoop(#40) .75 oz 

These are the scoops and the cinnamon sugar...

These are the scoops and the cinnamon sugar...

These cookies spread so avoid a scoop that is too big.

Happy Baking! Colette

Yield:

Half recipe:

Snickerdoodle Mise en Place

Snickerdoodle Mise en Place

Ingredients:

  • 12 ounces (340g) sugar
  • 8 ounces (227) unsalted butter
  • 2 eggs
  • 15 ounces (425g) all purpose flour
  • 1 teaspoon cream of tartar 
  • 1/4 teaspoon baking soda
  • 1/4 teaspoon salt

Cinnamon sugar: The dough is rolled in this before baking.

  • 7 ounces, 198g sugar
  • 1 Tablespoon, 14g cinnamon
  1. In the mixer, combine butter and sugar and mix on low speed until they come together. Stop mixer and scrape down. Increase the speed to medium and mix for about 2 minutes. Do not over mix. (The butter should lighten in color)
  2. Add eggs one at a time, mix each addition for 20 seconds on low speed and then 25 seconds on medium speed.
  3. Sift the cream of tartar, baking soda, flour and salt.
  4. Add the dry ingredients to the creamed mixture and mix on low speed until just combined - after the flour disappears.
  5. Chill dough for 20 minutes before scoop, or scoop and chill if you have room.
  6. Preheat oven to 350.
  7. Before baking: Roll cookies in cinnamon sugar and place on prepared tray.
  8. Bake at 350 for 10-12 minutes. Larger cookies may take a few extra minutes.

Snickerdoodles keep for a week in an airtight container. 

The dough has is less sticky then chocolate chip or oatmeal cookie dough - this is normal.

The dough has is less sticky then chocolate chip or oatmeal cookie dough - this is normal.


1 Comment
Finished Madeleines...

Finished Madeleines...

Master Recipe: Madeleines, Ingredient Function Friday, Episode 14

February 02, 2018

Welcome to the companion recipe to today's episode of Ingredient Function Friday!  Our topic for today is baking powder. This recipe uses 4g or 1 teaspoon of baking powder. Please check out the episode. Click on the video tab, above, to view.

This is a master recipe for a classic madeleine. I got this idea from one of my Craftsy students who asked if I had a madeleine recipe that could be customized. Here it is. Thanks so much for the great idea.

I love master recipes and one day I would love to write a baking book full of them.

Back to our madeleiens...the flavor profile can be changed to almost anything but chocolate. 

The reason for that - it’s best to use a recipe that starts out using chocolate and cocoa. Chocolate is an additional fat and cocoa is a drying agent so it is not like you can just take out some ingredients, add chocolate and cocoa and everything will be ok.

It’s a good lesson in adapting recipes, ingredients that do not change the chemistry of the batter are ok to add. But those that do - need a little more work.

Note: There are two mixing methods for madeleines, creaming method and ribbon method. This is a master recipe for the ribbon method.

Once you learn the technique you can be as creative if you want. If you have questions about creating great flavors, please don't hesitate to ask. Shoot me an email at BakingwithColette@gmail.com

Also, the first baker to post a photo of their finished madeleines will win a mini madeleine pan!!!!!

Happy Baking! Colette

Flavor ideas: lemon, lime, orange, rose water, almond, hazelnut, pecan, blueberry, cranberry and orange.

Master Recipe: Madeleines

Equipment: Stand mixer fitted with whisk attachment or hand held mixer fitted with whisk or standard beaters, sauce pan for browning butter, spatula, medium sized bowl, strainer, half sheet tray for supporting the madeleine pan.

Yield: 12 madeleines - large mold  or 24 mini madeleines

Ingredients:

Madeleine Mise en Place. The eggs are in a bowl of hot water so that they warm up a little - 5 minutes and the chill is gone. They will whip up better if they are not ice cold.

Madeleine Mise en Place. The eggs are in a bowl of hot water so that they warm up a little - 5 minutes and the chill is gone. They will whip up better if they are not ice cold.

  • 142g  butter, browned, and strained into the medium sized bowl and set aside.
  • 2 large eggs
  • 99g sugar
  • I teaspoon vanilla bean paste or vanilla extract
  • 28g honey
  • 160g all purpose flour
  • 4g, (1 teaspoon) baking powder
  • 1g, (1/4 teaspoon) salt

Melted butter and extra flour for preparing pan. Brush the madeleine pan, with melted butter and then sprinkle with flour and tap out the excess. You could use pan spray but the melted butter and flour will taste much better and provide a better relaease.


  1. Combine the eggs, sugar and honey in the mixer bowl. Start on medium speed and mix for 1 minute until the ingredients are combined. Then turn off mixer and scrape down the mixer bowl. Increase speed to high and beat for 6-8 minutes until it is pale yellow and thick and holds a 3 second ribbon when the batter falls off the end of the whisk. Only 3 seconds - no longer then that.
Ribboned eggs, sugar, vanilla bean paste (or extract) and honey

Ribboned eggs, sugar, vanilla bean paste (or extract) and honey


        2. Sift together the flour, baking powder and salt, set aside.


        3. Take about 6 ounces of egg mixture and mix it into the cooled, strained butter. (this lightens the texture of the butter.) 

Ribboned egg and butter mixture

Ribboned egg and butter mixture


        4. Fold the flour mixture into the remaining egg mixture and mix until the flour disappears.

Adding flour...

Adding flour...

1. Fold in the lightened butter mixture.

       5. Pipe into prepared madeleine pan, just to the top of the pan, do not over fill.

       6. Chill for 1 hour in the refrigerator. This helps them get a nice hump.

       7.  While the batter is chilling, preheat the oven to 375 degrees, 350 convection.

       8. Place chilled madeleine pan on half sheet pan before placing in the oven.

       9. Check the madeleines at 15 minutes. They will probably take a few minutes longer. We are looking for                    them to be light golden brown.

     10. Let madeleines cool for 8-10 minutes in the pan before un molding.

     11. Garnish with powdered sugar before serving.

Comment
Date Nut Muffins and a little cream cheese...

Date Nut Muffins and a little cream cheese...

Date Nut Muffins - Companion Recipe to Ingredient Function Friday, Episode 12

January 27, 2018

Hello Bakers,

Here is the companion recipe to today's episode. The only chemical leavener in this recipe is baking soda. It is just three quarters of a teaspoon and the lemon juice in the recipe activates it, helping our muffins rise nice and high.

This is an unusual recipe for muffin recipe. Most muffin recipes have baking powder in them and maybe a little baking soda. But not this one. Date Nut bread is not as popular as it once was. In the days of tearooms, date nut bread spread with cream cheese was a regular menu item.

It is so delicious. To give it an update, I have turned it into a muffin rather then a bread. It's probably better this way because when made into a loaf, it is nearly impossible to eat one slice and if you start with the cream cheese forget it.

Easy too and relatively quick. I used my Texas sized muffin pan but a regular muffin pan will work just fine. A mini loaf snack pan is another option. These freeze well too. 

The prize for the first posted photo of the muffins will win a standard muffin scoop! Yay. We have had three winners in the baking contests already. Congratulations to our bakers. So far I have sent prizes to Ohio, New York and Singapore.

Happy Baking! Colette

Equipment: 12 cup muffin pan, 6 cup muffin pan, liners, or mini loaf snack pan, well greased, saucepan, scale, sifter, spatula, scoop

Dut Nut Muffin Mise en Place

Dut Nut Muffin Mise en Place

Don't forget the lemon juice...(like I did in the mise en place photo)

Don't forget the lemon juice...(like I did in the mise en place photo)

Ingredients

  • 8 ounces water (227g)
  • 6 ounces (170g) dates, pitted and chopped, medium fine
  •  5 ounces brown sugar (142g)
  • 3 ounces (85g) butter, cut up
  • 1 ounce (28g) honey
  • 1/2 ounce (15g) (1 Tablespoon) lemon juice
  • 1 large egg
  • 1 teaspoon vanilla extract
  • 9 ounces (255g) all purpose flour
  • 1 teaspoon baking soda
  • 1/2 teaspoon salt
  • 3 ounces (85g) toasted, chopped walnuts
  • Pinch cinnamon and nutmeg

Cinnamon sugar to sprinkle on top before baking (optional)

  1. Bring water to a boil in saucepan, remove from heat.
  2. Add dates, brown sugar, honey, lemon juice, butter and vanilla. Stir until butter is melted.
  3. Let sit for 15 minutes. Add the egg and mix well. (you can whisk the egg with a fork before adding it to the date mixture.)
  4. Sift the flour, baking soda, salt and pinch of cinnamon and nutmeg.
  5. Pour the date mixture into a medium bowl. Add the dry ingredients. Mix halfway, add walnuts and mix only until combined.
  6. Scoop into prepared muffin tins and sprinkle lightly with cinnamon sugar.
  7. Bake at 350 degrees for 20-25 minutes. The muffins are done when a cake tester or skewer in the center comes out clean.
Here is what the wet mixture should look like...give it a stir before you add the dry ingredients.

Here is what the wet mixture should look like...give it a stir before you add the dry ingredients.


Comment
Newer / Older
Back to Top

email: bakingwithcolette@gmail.com